Twisting Puzzles
Puzzle Menus
![]()

Twisting Puzzles
Bandaged Cube (Meffert's) - Simple Solution
This page describes a solution to the Meffert's bandaged cube. If you made your own and it doesn't match the bandaging pattern of the Meffert's (shape not colour), then this won't work.
The bandaged cube is much harder to solve than it looks. The bandaged cubies that restrict your turns make it hard to spot the patterns in the ways that you can move the cube. You will still have to do a bit of work with this, but if you have gone as far as to make or buy a bandaged cube, you can probably handle it.
This solution is the second method on Jaap Scherphuis' page on the bandaged cube. I have added some pictures and explanations to try to make the method a little easier to follow for you. Jaap's site is an excellent resource for all things to do with puzzles. The first solution he has to the bandaged cube is a direct method. The second solution is a brilliant way to reduce the number of algorithms you need to remember.
About The Bandaged Cube
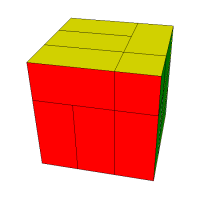
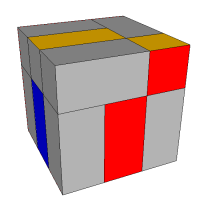
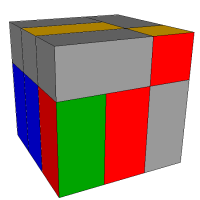
The first thing about the bandaged cube that you need to get used to is that it matters which way around you hold it. On my Meffert's cube, the bandaging and colour patterns are as you see in the picture.
The labels on the faces indicate how you should be holding the cube. The red face in the following image is to be held as the front face.
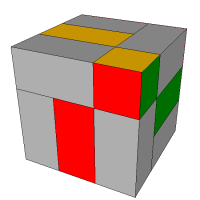
On the bandaged cube, there is only one corner that is not glued to a middle edge. It is the corner between the Upper, Front and Right faces - the UFR corner. It is referred to as the free corner and is significant on this puzzle. You can only turn a face if it contains the free corner. All moves start and end with the free corner in the UFR position.
Notation Used
The notation used in the solutions is the same as that used on the Rubik's cube pages. Where you see a D turn, you always turn the middle layer along with the bottom layer. Also, some algorithms start or end with the letters C and A. These letters represent a rotation of the whole cube around the free corner and are as follows,
- C - Clockwise rotation of 90° about the UFR corner. U goes to R, R goes to F and F goes to U
- A - Anticlockwise rotation of 90° about the UFR corner. U goes to F, R goes to U and U to R
Step 1 - Put The Puzzle Into The Correct Configuration
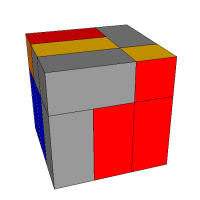
When you first start trying to solve this puzzle, this phase is potentially the most confusing. It's all about the centres of each face. It doesn't take long to do once you know what you are looking for. The three images below show the centres (and the edges that they are glued to). Start by bringing the free corner to the UFR position and then look at the centres of the U, L, R & F faces.
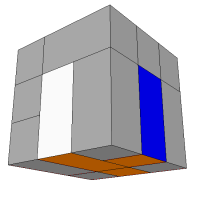
In the first image, you can see that the front face centre is connected to an edge on the D layer so is pointing straight down. The right face centre is connected to an edge on the B layer so is pointing to the back of the cube. The upper face centre is connected to an edge on the L layer so is pointing to the left. In the second image, you see the left face. Its centre is connected to a piece on the D layer and points downwards. The last image shows the back (white), left (blue) and bottom (orange) faces. You can get the puzzle into configuration in roughly this order,
- Start by placing the back/bottom face centres at the back of the cube - they are connected.
- Bring the free corner to the UFR position
- Rotate L centre into position
- Then do the R centre
- Place F & U centres
If, when you try to execute the first algorithm, and a turn can't be made, there are a few possibilities. First check that you have a cube with the correct bandaging pattern, then check that you have the centres where they need to be. Finally, check that you aren't misreading the algorithm.
Step 2 - Place The Back Bottom Left Corner (LBD)
Look for the piece that goes in the LBD position. On a Meffert's bandaged, that piece would be blue, white and orange. If the piece is in the following position (FRD), do the algorithm shown below to move it to a more favourable position,
C (F R U F R' F2 U') A
Otherwise, you will be doing the algorithm shown below until the piece is in the ULB position as shown in the next image,
F R U F R' F2 U'
This algorithm is a 5-cycle. It cycles the UFL, URB, ULB, FLD & DRB pieces. It will be used repeatedly in the solution. Once you have the LBD piece positioned at UBL as shown in the image above, you can place it where it belongs by going,
R D R' (F R U F R' F2 U') R D' R
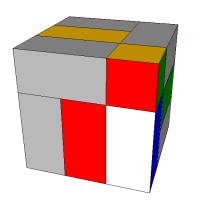
Step 3 - Place The Front Bottom Right Corner (FRD)
Look for the piece that goes on the bottom right of the front face. If it is in place, you can skip this stage. If not, keep on with our favourite 5-cycle algorithm until the piece you need is on the front bottom left of the cube, as you can see in the image.
F R U F R' F2 U'
When you have it as shown in the image, you can slot it into position with,
A (F R U F R' F2 U') C
Step 4 - Place The Back Bottom Right Corner (DRB)
The 5-cycle algorithm will eventually place the piece where it belongs. Anything up to and including a 4th go at the algorithm will be needed.
F R U F R' F2 U'
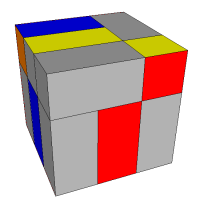
Step 5 - Place The Front Bottom Left Corner (FLD)
Look for the piece you need. It will either be in place (skip this stage) or somewhere in the top layer. The following algorithm is a 3-cycle. It swaps around the 3 corner-edge pairs of the top layer. Do this until the FLD piece is at the back left of the top face (the UBL position), as you see in the image.
R U R' F2 L F L' U' F
To move this piece into place (swap UBL & FLD pieces), you need the following algorithm,
U L F2 R' F L' F2 R F' U'
Step 6 - Solve The Top Layer
At this stage, the bottom two layers are completely solved but you may have one or two top layer pieces out of place. Wonderfully, you can solve this thing by giving it a little of the next algorithm until everything goes into place.
R U R' F2 L F L' U' F
You will need to do this only once or twice to finish the puzzle.