Twisting Puzzles
Puzzle Menus
![]()

Twisting Puzzles
Fully Functional 3x3x4 - Simple Solution
Notation
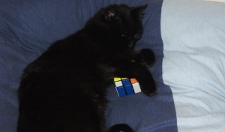
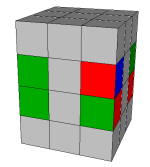
Hold the puzzle as shown in the image, with a 3x3 face on the top and bottom. The faces are F, B, R, L, U & D as with the cube. Small letters u and d refer to turns of the middle section. The letter u means that you turn the middle layer beneath the upper layer, turning in the same direction as U. For d, turn the middle layer above the D layer and turn it in the direction of D.
The Approach
In this method, the following order is observed,
- Solve u and d layer edges
- Solve u and d layer centres
- Solve U and D layer corners
- Solve U and D layer edges
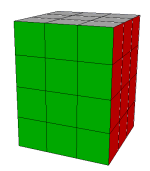
Step 1 - Solve u And d Layer Edges
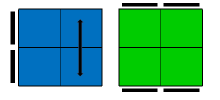
We will be hoping to end this stage with the inner two layers solved, like you see in the image.
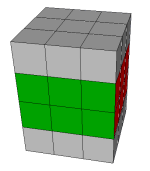
The edge pieces form the corners of the inner 2x3x3 section of the puzzle. We need to make sure that these edges are in the correct inner layer. In the diagram below, the edge on the front right d of the d layer belongs in the other inner layer. We know this because it is twisted in the d layer. The algorithm below will put the edge into position.
R2 d' R2 d' R2 d2 R2
Once you have the pieces in the correct layers, they may not be in the correct positions. You can swap adjacent edges by placing both edges on the right face of the u layer and using the algorithm shown below,
R2 d' R2 F2 d' R2 u R2 u' F2 u
Step 2 -Solve u And d Layer Centres
The main algorithm for swapping centres between layers is simple and can be used repeatedly to solve the inner part of the puzzle. Place the two centres that you want to swap at Ru and Ld and then use the following algorithm.
R2 d2 F2 d2 F2 d2 F2 R2
That really is all you need. You can just keep swapping and swapping until the middle section is complete.
Step 3 - Bring The Outer Corners Into Their Correct Layers
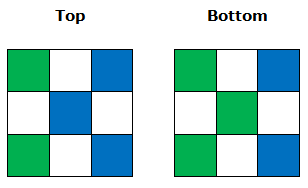
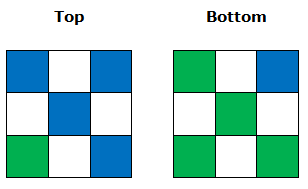
The following diagrams show some, but not all, of the scenarios that can arise. The algorithms are simple and, by repeating them, one of these scenarios is sure to come up. The diagrams of the bottom face show what you would see if you tilt the top of the cube away from you.
R2 U2 R2
R2 U' R2
Step 4 - Permute Corners Within Their Layers
Now that the outer corners are in their correct layers, some may be out of position. The following algorithms swap adjacent pieces in one or both of the outer layers. They do this without disturbing the pieces that you have already placed.
Swap Adjacent Corners - Both Layers
R2 U R2 y' U2 R2 U R2
Swap Adjacent Corners - Top Layer
R2 D' R2 F2 D' R2 U R2 U' F2 U
Step 5 - Bring Edges Into Their Correct Layers
The algorithm we used in step 2 will disturb the inner layers if we try to use it at this stage. If you do use it, it's normally quite straightforward to correct the disruption to the inner layers. Now that the inner layers are solved, we have effectively reduced the puzzle to a 3x3x3 cube. We have, rather strangely though, got a situation where the middle layer has been solved first. The parity of the 3x3x3 cube means that it is not possible to swap only two edges or corners without disrupting other pieces - so you will need to look at swapping 3 or 4 edges at a time.
| Aim | Algorithm |
|---|---|
| Swap FU-FD & RU-RD | (F2 R2) x 3 |
| Swap FU-RU-FD | R2 U2 D L2 F2 R2 U' E2 R2 F2 |
For E2, turn both inner layers (two turns, either direction). This second algorithm can be useful when you have one edge in u and one in d to swap. Place the dodgy edges at RU and FD.
Step 6 - Permute Edges Within Their Layers
This is the PLL stage of the standard 3x3x3 cube. Algorithms that don't disturb the F2L should all work here, providing you treat the inner 3 layers as though they are a single layer and don't have to make single turns of the 3x4 faces.
| Aim | Algorithm |
|---|---|
| Swap Adjacent Pairs (F-R & L-B) | F2 U F2 U' F2 L2 F2 U' L2 U F2 L2 |
| Swap Opposite Pairs (F-B & R-L) | M2 U M2 U2 M2 U M2 |
| Clockwise 3 Cycle (F-L-R) | M2 U R2 F2 L2 D2 L2 F2 R2 U M2 |
| Anti-Clockwise 3 Cycle (F-R-L) | M2 U' R2 F2 L2 D2 L2 F2 R2 U' M2 |
| Swap UF-UR & DF-DR | F2 U R2 F2 R2 U2 F2 R2 F2 U F2 |
| Swap UF-UB & DF-DB | U2 M2 D2 M2 |
The last two are the most useful for anyone that already has their own edge-swapping PLL algorithms. They deal with the problem of not being able to swap a single pair of edges by doing this on both the U and D layers.
Step 7 - Deal With Parity
The centre pieces of this puzzle can be in either position. This makes it hard to prevent parity problems at the end. You will notice that you have a parity problem when you can't find an edge-swapping case that will finish one of the layers. Your best efforts should leave you with two unsolved edges on one of the outer layers. If that is the case, we will need to do a little bit of messing to fix the problem.
First, use the edge-swapping algorithms so that you are left with 2 unsolved edges in one of the outer layers - that you should place on top.
If the edges are opposite one another, place them at UF and UB (front and back). Then do the following algorithm,
R2 U2 R2 U2 R2 U2
This will solve the two edges but it will disturb the middle layer. Don't worry that can be dealt with later.
If your two unsolved edges are not opposite one another, do the algorithm anyway. You will get the same change in the middle layers but will have an edge permutation case that you can solve.
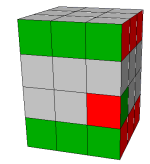
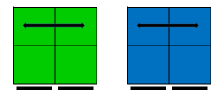
When you have a parity problem, once you place all of the edges on the outer layers, the problem will have moved to the inner layers of the puzzle. You should have this situation,
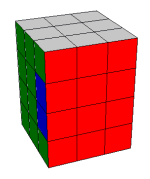
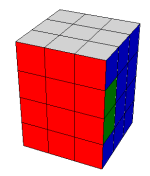
In the images, the red face looks solved but the inner layer edges are all flipped. If you have the red face towards you, the following algorithm will solve the puzzle from this state,
U2 u2 R2 F2 u2 F2 R2 U2 u2