
| Multiwingspan Home Page |
| Multiwingspan Games |
| Gnasher @ Multiwingspan |
| Multiwingspan Calendar |
| Multiwingspan Clock |
| About Multiwingspan |
| Visual Basic 6.0 Guide |
| Visual Basic 6.0 Examples |
| Turbo Pascal Guide |
| SWI Prolog Guide |
| Visual Basic 2005 Guide |
| Structured Query Language |
| HTML Design Tasks |
| Introduction To HTML |
| Introduction To CSS |
| Introduction To Javascript |
| AS/A2 Level Computing |
HTML is a way of describing the way a web page looks. The browser reads and decodes these instructions before displaying the page.
Instructions are in the form of tags.
For example, <center>My Writing In The Centre Of The Page</center>
Most tags (but not all) come in pairs like the one above. The writing after the <center> tag will be centred until the browser finds a </center> tag. The forward slash (/) indicates the end of the instruction.
<html>
<head>
<title>The Title Of The Page</title>
</head>
<body>
</body>
</html>
All instructions about what to appear on the page appear between the <body> and </body> tags.
Web pages are text files.
That means we can use Notepad to make them.
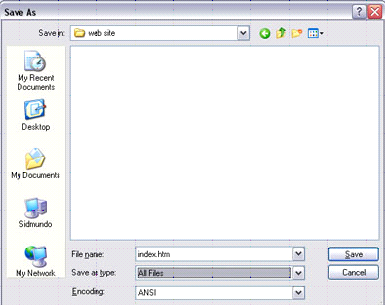
When you save your work, make sure to save them with the extension .htm and to change the file type to All Files.
Remember to Refresh your web page when you have just saved some changes to the HTML. This forces the browser to read through the HTML instructions again.
To change the background colour, you modify the <body> tag. In the example below bgcolor is an attribute of the body tag.
Eg <body bgcolor="purple">
Make sure that you don't add more than one body to your page. It looks as weird in HTML as it does on people!
The easiest way to choose a colour is to use its name (there are other ways to do this). The following named colours can normally be used.
| black | silver | gray | white |
| maroon | red | purple | fuchsia |
| green | lime | olive | yellow |
| navy | blue | teal | aqua |
The tag for changing the way that text appears is the <font> tag. The </font> tag is used to end the instruction.
| To change the colour | <font color="green">This writing will be green</font> |
| To change the typeface | <font face="Arial">This text will be in Arial</font> |
| To change the size | <font size="4">This text will be Size 4</font> |
Be aware that font sizes go from 1 to 7. If you use a number higher than 7, it will not make the font size any larger.
You can make more than one change at the same time,
For example, <font color="pink" size="4">Size 4, pink writing</font>
| Open tag | Close tag | Effect |
| <b> | </b> | text displayed in bold |
| <i> | </i> | text displayed in italics |
| <br> | none | starts a new line |
| <u> | </u> | underlines |
| <p> | </p> | marks a paragraph |
Remember hyperlinks are the only thing on a web page that might need to be underlined.
Underlining is something we do when we write by hand because we can't do bold or italics. It looks a bit ugly on the computer even when you are word processing or desktop publishing.
Below is an example of a hyperlink in HTML.
<a href="http://www.multiwingspan.co.uk">Multiwingspan</a>
This instruction is in 3 parts.
For small web sites it makes sense to place all of the pages in the same folder. This will make linking the pages an easier task.
If you want to link to a web page called mypage.htm, which is stored in the same folder, you write the following,
<a href="mypage.htm">Click Here For My Page</a>
When you put an image into a Word document, the image file is embedded into the file that you create. Web pages are different. The web page does not contain the image. It loads the image from a separate file.
Find a suitable image file and make sure that it is saved in the same folder as your web page.
Images should be of the type .jpg and .gif. Images created in Paintbrush are usually .bmp files and tend to be too slow to load.
The following tag will allow you to include an image called gnasher.jpg in your page.
<img src="gnasher.jpg">
People find it hard to read large amounts of information off a screen. Bullet-point lists are a good way to make it easier to read your pages.
You need to use 2 sorts of tags to make a list. Here is an example of a bullet-point list in HTML.
<ul>
<li>First Item In My List</li>
<li>Second Item In My List</li>
<li>And So On</li>
</ul>
UL stands for unordered list (because there are no numbers).
LI stands for list item (each of your bullet points).
To make your list have numbers instead, use the tag <ol> (ordered list) instead of <ul>.
Tables in HTML can get a bit complicated. Some people find it hard to design a table when they can't see what they're doing until it's done. A simple hand-drawn sketch of what you want is always a good idea.
There are lots of tags for tables but the main ones are,
| <table> </table> | Used to mark the start and end of the table code. |
| <tr></tr> | Used to show the start and end of each row in the table. (Table Row) |
| <td></td> | Used to mark the start and end of each cell in the table (Table Data) |
Here is an example of a table in HTML.
<table width="50%" border="1">
<tr>
<td width ="40%" align="center" bgcolor="gold"><b>Column 1</b></td>
<td width ="60%" align ="center" bgcolor="gold"><b>Column 2</b></td>
</tr>
<tr>
<td>Some Stuff</td>
<td>More Stuff</td>
</tr>
</table>
You can use tables to help you place items on the page where you want them. Suppose you wanted to create an effect like the one below.
|
Welcome To My Web Site | |
The image on the left is aligned to the left. The text is centred.The second image is aligned to the right.
Using a table without a border, this effect can be achieved quite easily.
For example,
<table width ="100%" border="0" bgcolor="yellow">
<tr>
<td width ="15%" align="left"><img src="books.gif"></td>
<td width = "70%" align="center" valign="middle">Welcome To My Web Site</td>
<td width="15%" align="right"><img src="books.gif"></td>
</tr>
</table>
Use the WWW - it's full of web pages (Click on View Source) to see how it's done. Or search for HTML tutorials and references.
If you know how to do something in Front Page or Dreamweaver but not HTML, design it in the visual editor and take a sneaky look at the HTML that has been produced.
Return To HTML Tasks || Return To Homepage