BBC Microbit
![]()

BBC micro:bit
MPR121 Capacitive Touch
Introduction
The touch pins on the micro:bit are fine for a little bit of playing around. You only have three of them, though, and you have to ground yourself too. If you want to do some more complex circuits with touch input, you will need to use a dedicated integrated circuit. The MPR121 can handle 12 touch inputs using capacitive sensing. This gives you much more scope for making all sorts of custom input devices and sensors, using anything that is reasonably conductive.
I've used the Adafruit breakout board for the MPR121, which cost around £7. Unlike the CAP11xx family of integrated circuits, this chip doesn't drive LEDs for you. You do get 12 inputs on the one breakout though. It works nicely at 3.3V and you communicate with the IC using the i2c protocol.
Circuit
At the bottom of the diagram are the standard i2c connections that you make to the micro:bit. The 12 wires at the top of the diagram should be connected to your conductive material. When you are testing, use a few short jumper leads or some solid core wire.

Programming
This is enough to get started. It's based on the Adafruit library. I used their default settings for reset and things worked first time. You need to see serial output in the REPL window or a terminal emulator to get this going. If you don't have that, replace it with some output on the LED matrix.
from microbit import *

class mpr121:

    def __init__(self):
        self.ADDRESS = 0x5a
        self.TOUCHTH_0 = 0x41
        self.RELEASETH_0 = 0x42
        self.SOFTRESET = 0x80
        self.ECR = 0x5E
        self.MHDR = 0x2B
        self.NHDR = 0x2C
        self.NCLR = 0x2D
        self.FDLR = 0x2E
        self.MHDF = 0x2F
        self.NHDF = 0x30
        self.NCLF = 0x31
        self.FDLF = 0x32
        self.NHDT = 0x33
        self.NCLT = 0x34
        self.FDLT = 0x35
        self.DEBOUNCE = 0x5B
        self.CONFIG1 = 0x5C
        self.CONFIG2 = 0x5D


    def write_reg(self,reg,value):
        i2c.write(self.ADDRESS, bytes([reg,value]), repeat=False)

    def touched(self):
        self.write_reg(0,0)
        lower = i2c.read(self.ADDRESS,2,repeat=False)
        return lower[0] + (lower[1]<<8)


    # reset of the device
    def reset(self):
        self.write_reg(self.SOFTRESET, 0x63)
        sleep(1)
        self.write_reg(self.ECR, 0x00)
        self.set_thresholds(12, 6)
        self.write_reg(self.MHDR, 0x01)
        self.write_reg(self.NHDR, 0x01)
        self.write_reg(self.NCLR, 0x0E)
        self.write_reg(self.FDLR, 0x00)
        self.write_reg(self.MHDF, 0x01)
        self.write_reg(self.NHDF, 0x05)
        self.write_reg(self.NCLF, 0x01)
        self.write_reg(self.FDLF, 0x00)
        self.write_reg(self.NHDT, 0x00)
        self.write_reg(self.NCLT, 0x00)
        self.write_reg(self.FDLT, 0x00)
        self.write_reg(self.DEBOUNCE, 0x00)
        self.write_reg(self.CONFIG1, 0x10)
        self.write_reg(self.CONFIG2, 0x20)
        self.write_reg(self.ECR, 0x8f)


    def set_thresholds(self, touch, release):
        for i in range(12):
            self.write_reg(self.TOUCHTH_0 + 2*i, touch)
            self.write_reg(self.RELEASETH_0 + 2*i, release)


cap = mpr121()
cap.reset()
while True:
    a = cap.touched()
    print('{:012b}'.format(a))
    sleep(20)
Next, I hooked up a buzzer on pin 2 and made a quick Play-Doh keyboard.
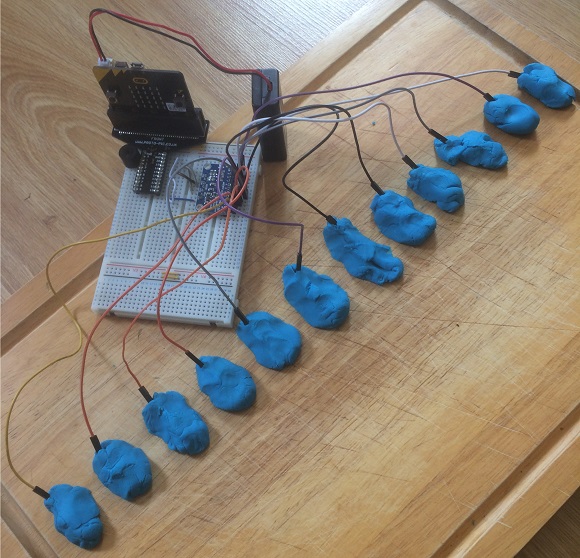
I adapted the program to start and stop the playing of music notes.
from microbit import *
import music
class mpr121:
def __init__(self):
self.ADDRESS = 0x5a
self.TOUCHTH_0 = 0x41
self.RELEASETH_0 = 0x42
self.SOFTRESET = 0x80
self.ECR = 0x5E
self.MHDR = 0x2B
self.NHDR = 0x2C
self.NCLR = 0x2D
self.FDLR = 0x2E
self.MHDF = 0x2F
self.NHDF = 0x30
self.NCLF = 0x31
self.FDLF = 0x32
self.NHDT = 0x33
self.NCLT = 0x34
self.FDLT = 0x35
self.DEBOUNCE = 0x5B
self.CONFIG1 = 0x5C
self.CONFIG2 = 0x5D
def write_reg(self,reg,value):
i2c.write(self.ADDRESS, bytes([reg,value]), repeat=False)
def touched(self):
self.write_reg(0,0)
lower = i2c.read(self.ADDRESS,2,repeat=False)
return lower[0] + (lower[1]<<8)
def istouched(self, electrode):
pattern = self.touched()
return (pattern & (1 << electrode)) > 0
def reset(self):
self.write_reg(self.SOFTRESET, 0x63)
sleep(1)
self.write_reg(self.ECR, 0x00)
self.set_thresholds(12, 6)
self.write_reg(self.MHDR, 0x01)
self.write_reg(self.NHDR, 0x01)
self.write_reg(self.NCLR, 0x0E)
self.write_reg(self.FDLR, 0x00)
self.write_reg(self.MHDF, 0x01)
self.write_reg(self.NHDF, 0x05)
self.write_reg(self.NCLF, 0x01)
self.write_reg(self.FDLF, 0x00)
self.write_reg(self.NHDT, 0x00)
self.write_reg(self.NCLT, 0x00)
self.write_reg(self.FDLT, 0x00)
self.write_reg(self.DEBOUNCE, 0x00)
self.write_reg(self.CONFIG1, 0x10)
self.write_reg(self.CONFIG2, 0x20)
self.write_reg(self.ECR, 0x8f)
def set_thresholds(self, touch, release):
for i in range(12):
self.write_reg(self.TOUCHTH_0 + 2*i, touch)
self.write_reg(self.RELEASETH_0 + 2*i, release)
def bit_length(n):
bits = 0
while n >> bits: bits += 1
return bits
def nleds(value):
img = Image('00000:'*5)
sp = img.set_pixel
counter = 0
for row in range(0,5):
for col in range(0,5):
if counter<value:
sp(col,row,9)
else:
sp(col,row,0)
counter += 1
return img
notes = [262,294,330,349,392,440,494,523,587,659,698,784]
cap = mpr121()
cap.reset()
last = -2
while True:
x = cap.touched()
# play note from leftmost press only
leftmost = bit_length(x&-x) - 1
if leftmost != last:
if leftmost==-1:
music.stop(pin2)
display.clear()
else:
music.pitch(notes[leftmost],-1,pin2, False)
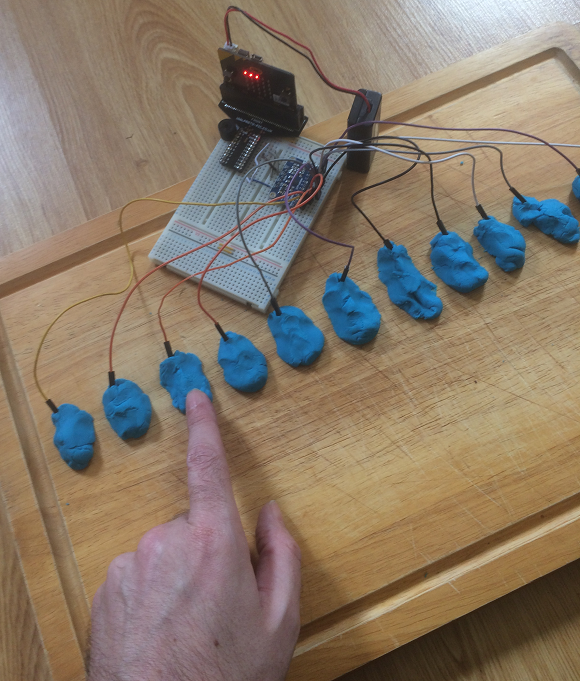
display.show(nleds(leftmost+1))
last = leftmost
The use of the if statements in the loop reduces the flicker and clicking you would get by constantly updating the sound and display.
Challenges
- Obviously, implement touch input wherever you previously had a less interesting method.
- There is much fun to be had in trying out different things as inputs. Fruit is quite standard these days, so try to be more inventive.
- You don't have to use weird things as inputs. Making a decent keypad out of tin foil is quite a mission.
- Make some artwork that has touch sensors dotted around it. These could output speech or sound input or activate some other outputs. You could make a robot friend. This breakout leaves most of your micro:bit free to use for impressive effects.
- The music example used a simple selection of note frequencies. You could choose your notes more carefully and make more interesting music as a result.
- In the example with the buzzer, the code filters out all but the leftmost button being pressed. You could use a different approach. Notes could be produced with combinations of button presses, as you would on a woodwind instrument. A separate button could be used to start and stop the note.
- The music example could be adapted for MIDI. That gives you access to more interesting effects and sounds. A nice drum kit or sound effect trigger would be good.
- Make two electrical contacts out of two strips of kitchen foil or copper tape and lay them flat and quite close to each other. Write a program that stores the order in which the sensors are touched. Adapt the program to detect when a finger is swiped left or right across your contacts. Build up your program to detect swipes on the vertical axis too.
- You can change the sensitivity of the sensor so that proximity triggers a reading. By positioning electrodes carefully, you can make sensors that read position in 2 or 3 dimensions. Some research might be worthwhile before embarking on this.