Computer Science
Data Representation
Program Design
Hardware & Software
Networks
Databases
Data Structures
Algorithms
Other
![]()


Computer Science
Database Design
Relational Databases - Key Terms
A relational database is a collection of tables.
In a relational database, we use the term relation to describe the headings and data that model an entity (table). The word refers not only to the attributes (field names and data types) but to the valid attribute values stored under each attribute. A set of attribute values is called a tuple. This is analagous to the rows in our database table.
In a relational database, each tuple or row must have a unique identifier. Often, one attribute is unique to each tuple and is used as the Primary Key in a table definition. Where no single attribute is unique to a tuple, a combination of two or more attributes is used to identify the tuple - this is called a Composite Primary Key.
Relationships are modelled by having common attributes among entities. An attribute in a table that is the primary key of another table is called a Foreign Key.
Since there is related data in several tables in a relaionship data, updates to one table may require updates to related tables. The need to cascade updates across more than table is called Referential Integrity.
Normalisation
The aim of database design is to store all of the data without unnecessary duplication of information. Duplicating data requires more work on maintaining referential integrity and leads to errors. Normalisation is a process that allows us to optimise a data model to avoid duplicating data.
Example - The Context
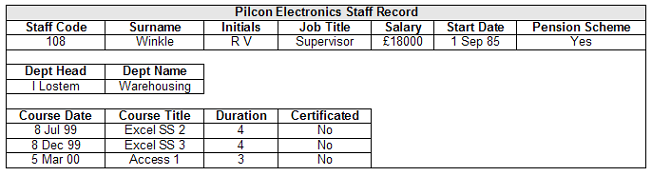
Pilcon Electronics is a manufacturer with a traditional hierarchical staffing structure. The personnel department is setting up a database to hold personal staff details which are currently stored manually. Each member's staff details are held on a single sheet.
The first thing we need to do is normalise the data. Data normalisation is a technique established by E F Codd to simplify the structure of data and to overcome the problems of data duplication in a database.
Original Structure
StaffMember(Staff Code, Surname, Initials, Job Title, Salary, Start Date, Pension, Dept Name, DeptHead [Course Date, Course Title, Duration, Certificated])
The fields in square brackets are repeating fields. The data as it is could not be represented in a single table.
First Normal Form
Data is in first normal form if there are no repeating fields. To put this data into first normal form we need to create a new entity for the repeating fields.
STAFFMEMBER-1 (StaffCode, Surname, Initials, Job Code, JobTitle, Salary, StartDate, Pension, DeptCode, DeptName, DeptHead)
TRAINING-1 (CourseDate, StaffCode, CourseTitle, Duration, Certificated)
Second Normal Form
To put the data into second normal form we need to remove non-key fields from tables with composite primary keys where those fields are not functionally dependent on the whole of the primary key.
STAFFMEMBER-2 (StaffCode, Surname, Initials, Job Code, JobTitle, Salary, StartDate, Pension, DeptCode, DeptName, DeptHead)
TRAINING-2 (CourseDate, StaffCode, CourseTitle, Duration, Certificated)
In this example, the data is already in second normal form since course details only appear in the DB if a staff member attends a course.
Third Normal Form
As far as we are concerned, this is the final stage of data normalisation. To place data in third normal form we need to remove non-key attributes that could act as a unique identifier in a separate table.
STAFFMEMBER-3 (StaffCode, Surname, Initials, Job Code, Salary, StartDate, Pension, DeptCode)
TRAINING-3 (CourseDate, StaffCode, CourseTitle, Duration, Certificated)
JOB-3 (JobCode, JobTitle)
DEPARTMENT-3 (DeptCode, DeptName, DeptHead)
Having the job and department tables allows us to edit details of these in one location and avoids the problems of duplication and inconsistency.
Data Dictionary
The following tables describe the data structure for the Pilcon Electronics database.
Staff Member
| Field Name | Data Type | Field Size | Input Mask | Validation Rule | Validation Text | Required | Indexed |
|---|---|---|---|---|---|---|---|
| StaffCode | text | 3 | >=100 and <=200 | Range 100 to 200 | Yes | Yes (no duplicates) | |
| Surname | text | 25 | No | No | |||
| Initials | text | 4 | No | No | |||
| JobCode | text | 3 | LL0 | No | No | ||
| DeptCode | text | 3 | LLL | "ACC" or "GOS" or "MIS" or "PER" or "PRO" or "PUR" or "RAD" or "SAL" or "WAR" | Invalid Code | No | Yes (duplicates OK) |
| Salary | currency | 0DP | >=8000 and <=45000 | Range 8000 to 45000 | No | No | |
| StartDate | date | <=now() | Invalid Date | No | No | ||
| Pension | Yes/no | No | No |
Training
| Field Name | Data Type | Field Size | Input Mask | Validation Rule | Validation Text | Required | Indexed |
|---|---|---|---|---|---|---|---|
| CourseDate | date | Yes | Yes (Duplicates OK) | ||||
| StaffCode | text | 3 | >=100 and <=200 | Range 100 to 200 | Yes | Yes (Duplicates OK) | |
| CourseTitle | text | 30 | No | No | |||
| Duration | number | Integer 0 dp | >=1 and <=10 | Range 1 to 10 | No | No | |
| Certificated | Yes/no | No | No |
Job
| Field Name | Data Type | Field Size | Input Mask | Validation Rule | Validation Text | Required | Indexed |
|---|---|---|---|---|---|---|---|
| JobCode | text | 3 | LL0 | Yes | Yes (No Duplicates) | ||
| JobTitle | Text | 35 | No | No |
Department
| Field Name | Data Type | Field Size | Input Mask | Validation Rule | Validation Text | Required | Indexed |
|---|---|---|---|---|---|---|---|
| DeptCode | text | 3 | LLL | "ACC" or "GOS" or "MIS" or "PER" or "PRO" or "PUR" or "RAD" or "SAL" or "WAR" | Invalid Code | Yes | Yes (duplicates OK) |
| DeptTitle | Text | 35 | No | No | |||
| DeptHead | text | 3 | >=100 and <=200 | Range 100 to 200 | Yes | Yes (No Duplicates) |
Relationships
Open up the relationships editor in Access. Make sure that all tables are shown. Right click with the mouse and choose to add any tables that aren't displayed. To create a relationship, click and drag the foreign key to the primary key in the related table. Choose to Enforce Referential Integrity.
The following relationships need to be established,
DeptCode in DEPARTMENT has a one-to-many relationship with DeptCode in STAFFMEMBER. There may be many staff in each department but each member of staff can only belong to one department.
JobCode in JOB has a one-to-many relationship with JobCode in the STAFFMEMBER table. Each member of staff has only one job title but many members of staff may have the same job title.
StaffCode in STAFFMEMBER has a one-to-many relationship with StaffCode in the TRAINING table. Each member of staff may undertake more than one course of training.
StaffCode in STAFFMEMBER has a one-to-many relationship with DeptHead in the DEPARTMENT table.
Entering Data
The sample data is provided in a spreadsheet, Pilcon Data.xls - 21.5KB.
Copy the sample data for the JOB and DEPARTMENT tables into the tables that you have made.
Open up the STAFFMEMBER table, click on the JobCode field and select LOOKUP WIZARD in the data type column. Select to look up the values for this field from the JOB table. Use a similar process to create a lookup for the DeptCode field (from the DEPARTMENT table)
Now that the database is set up to receive data, enter a few records for the remaining empty tables. Test that the validation rules and input masks do the job that they are supposed to. Copy the remaining details from the sample dataset.
Data Entry Forms
Use the form wizard to create forms to allow you to enter data into each of the tables.
Create an extra form in design view that will act as a menu for the database system. Set this form to open automatically when the database file is opened. Keep the design simple and tidy.
Queries
Select Queries
Select queries display data from one or more tables in table form depending on the search criteria specified in the query design.
1. Create a query to list all of the staff members (names, initials, job titles, salary) that are in the company pension scheme.
You can also create a parameter query by expressing the search criteria for a field as in the following example,
[Enter Staff Code]
2. Create a parameter query to return all of the staff members (names, initials, job titles, salary) from a particular department.
Cross-Tab Queries
Cross-tab queries use row and column headings to display information in a more coherent form than might be displayed with a select query.
Design a query like the one below and run it to see the output. You need to choose Cross-tab query form the query menu.
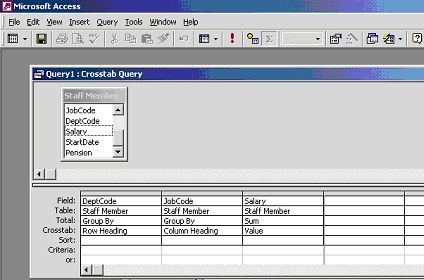
Cross-tab queries require at least 3 elements.
- One field selected as the row heading.
- One field selected as the column heading
- One field with a value option using some sort of aggregate function (sum, avg)
Update Queries
Update queries can be used to change the values of particular fields. This is the often the best way to make changes to the data that need to be applied to any record that meets the criteria for change.
For example, we can design an update query to apply a 3% increase in salaries to everyone who is not a head or assistant head of department.
To do this, start to design a new query and choose Update query from the query menu.
Select the job code (from job table), staff code, surname and salary fields (from staffmember table).
Set the search criteria for job code to be <>HD1 AND <>HD.
Set the update to part of the salary field to [Salary]*1.03.
Run the query. Change the values back by creating another update query.
Using Date Functions
There are several built-in functions that can be used to make writing queries slightly easier. Imagine that we wanted to create a list of staff who joined the company 15 years ago.
Instead of entering a field for StartDate, type in Expr1: Year([StartDate]) as the field in the query window. Now search for a start date of <Year(Now())-15.
Stringing Actions Together Using Macros or Buttons
Let's imagine that we wanted to add a button to the staffmember form so that we can quickly find out who someone's head of department is.
Start by opening the staffmember form.
Leave the form open and go to design a select query. Add the staffmember, department and job tables to the window. Select DeptCode, department title from Department, Staffcode, surname, initials and job title from the Staff Member and Jobs tables.
Under the criteria for deptcode, click with the right mouse button and choose build. Select forms, open forms from the list on the left, choose the staffmember form and select the deptcode field. Double click on value to get an expression in the window. Save and close the query.
Now go back to the staffmember form. Add a button near to the deptcode field and give it a suitable name. Choose run query from the miscellaneous section of the options and choose to run the query that you have just created.
Test the whole thing and enjoy the automation. A macro could be used to close the form down after the query had been run if this is required.