Raspberry Pi Pico
MicroPython - Basics
MicroPython - More Involved
MicroPython - Pico W
MicroPython - micro:bit
MicroPython - Projects
CircuitPython - Some Basics
CircuitPython - HID Adventures
CircuitPython - Experiments
Other Pages
![]()


Raspberry Pi Pico
4 x 7 Segment Display (Driverless)
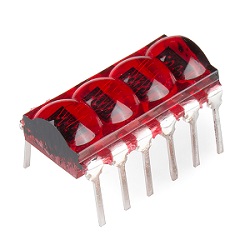
This project is not so much about the specific component that I am using as it is about the principle behind the coding. I was aiming to drive a 4 digit 7 segment display using only the Pico. The display I used was an old one which is a bit difficult to find these days. It is a tiny 'bubble' display from HP called the HP QDP 6064. It looks like this,
These displays, like the larger ones you find, are common cathode. That means that there is an anode for each of the LEDs in the segment and a cathode for each digit. To display four digits at a time, you rapidly change which of the four cathodes you are driving LOW. This creates what is commonly known as the 'persistence of vision' effect which makes it appear as though all digits are on. The difficulty you normally find with this on a microcontroller is that you need the cathode switching to be happening all of the time. Pausing or doing anything else with the microcontroller prevents you from doing this quickly enough. The Pico, however, allows you to use two threads and have the display being updated on a separate core. This concept should work for any multi-digit displays that are not already connected to a driver.
Here was my setup on a breadboard. As with my other pages, my photography is not amazing. The display is crystal clear in real life and there is no flicker.
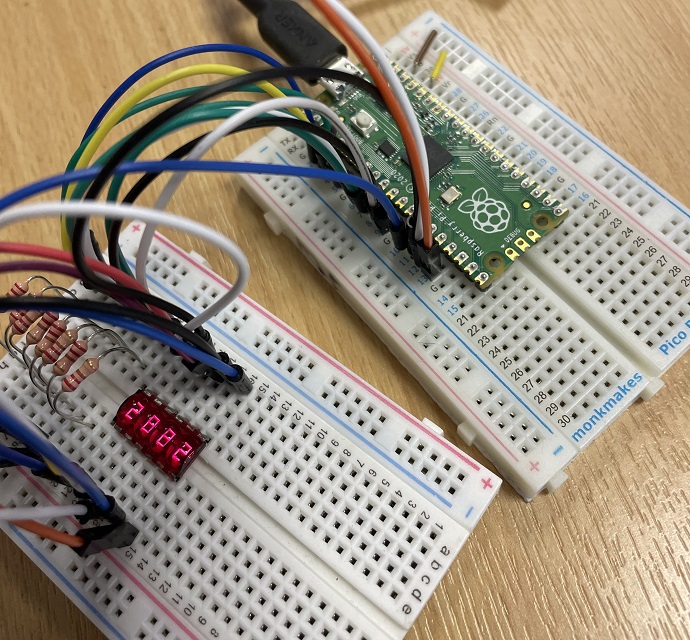
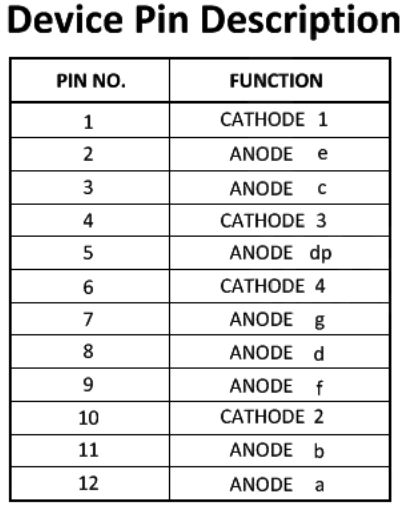
To make the circuit I used this table with the pinout data. There is a dot on the underside of the display showing which pin is Pin 1. Larger displays don't tend to have their pins in the same configuration. The datasheets have a diagram showing something similar to this. You also tend to get a colon on the larger displays. These are generally separate LEDs from the digits. I used a resistor (220 Ohm here) for each of the anodes.
Here is the program I used for testing,
from machine import Pin
from time import sleep_us, sleep
from random import randint
import _thread

# bianry patterns for digits
digits = [
  0b11111100,
  0b01100000,
  0b11011010,
  0b11110010,
  0b01100110,
  0b10110110,
  0b10111110,
  0b11100000,
  0b11111110,
  0b11110110]

# pre-calculated lists of bits
d = [ [n >> i & 1 for i in range(7, -1, -1)] for n in digits]

# setting up the pins as lists
anode_pins = [2, 3, 4, 5, 6, 7, 8, 9]
cathode_pins = [10, 11, 12, 13]

anodes = [Pin(p, Pin.OUT) for p in anode_pins]
cathodes = [Pin(p, Pin.OUT) for p in cathode_pins]

# this is the number we want to show
v = 0

# this is our routine for showing the number v on the display
def update_display():
    global v
    for c in cathodes:
        c.value(1)
    while True:
        for c in range(4):
            cathodes[c].value(0)
            for a in range(8):
                anodes[a].value(d[(v //(10**(3-c))) % 10][a])
            sleep_us(250)
            cathodes[c].value(1)

# start the update_display routine on a separate thread
update_thread = _thread.start_new_thread(update_display, ())


# change the value of the global variable
while True:
    v = randint(0,9999)
    sleep(0.5)
This worked pretty well for me. I replaced the while loop with some counting and, as long as I didn't change the global variable too quickly, I had no problems with the updating. Bear in mind that, once per second is likely to be the quickest you would need for a clock or stopwatch. At that kind of frequency, it was fine. If I took it down to 0.1 seconds, I started to get a few issues. In normal use though, the display looked great and, with the number of pins you have on the Pico, I'd be happy to use this approach in future projects.