Raspberry Pi Pico
MicroPython - Basics
MicroPython - More Involved
MicroPython - Pico W
MicroPython - micro:bit
MicroPython - Projects
CircuitPython - Some Basics
CircuitPython - HID Adventures
CircuitPython - Experiments
Other Pages
![]()


Raspberry Pi Pico
USB MIDI 16 Step Sequencer
The idea behind this project was to make a tool to make and play percussion loops. In the end, constrained by my choice of display, my step sequencer has 16 steps. That means that, in each loop, there are 16 points in time where a sound can be played. There are 7 tracks, each one a different percussion instrument. By choosing which steps are on and off on each of the tracks, I can design and then play percussion instruments precisely timed and repeat the loop over and over again.
I began this project by just writing a simple class to store, manipulate and then play back the notes. I used the USB MIDI library that I had used for my Play Doh drum kit. Originally, I did this with 24 steps and 8 tracks. I used binary numbers to store the track data. I even experimented with randomly choosing the instruments to go with each track. The effects were pleasing enough for me to want to do more. That's when I reached for the Pimoroni Scroll Pack.
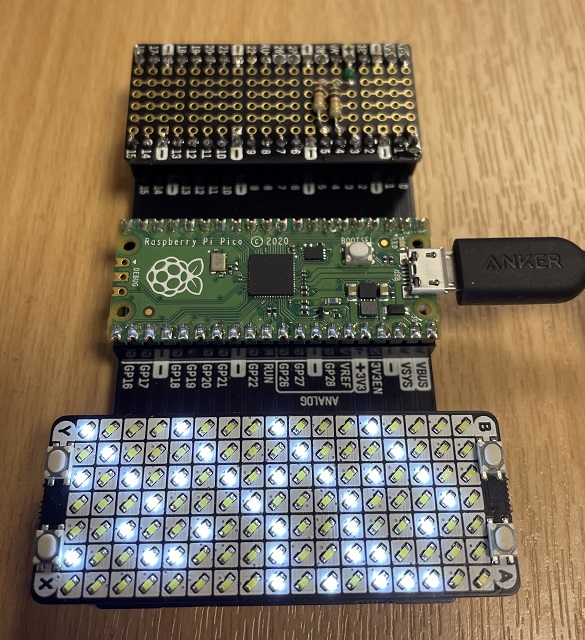
This is where I started. I used the lights on each row to show which notes were on and off for each track. The track data had been hard coded into the program at this point. The board at the top is a fix for a problem that I have been noticing with CircuitPython and some accessories. CircuitPython checks the pull-up resistors for I2C devices and gets a little fussy about them. In order to fix this, I used a Pico proto-board (from Pimoroni) and just soldered some 10K resistors from 3V3 to each of the two pins (4 and 5) that are used for I2C on the Scroll Pack. This fixed the problem straight away. I'll probably do this again with pins 2 and 3 on the same proto-board. These are used on the Pico to HAT accessory I have used for connecting Raspberry Pi pHATs and HATs to the Pico.
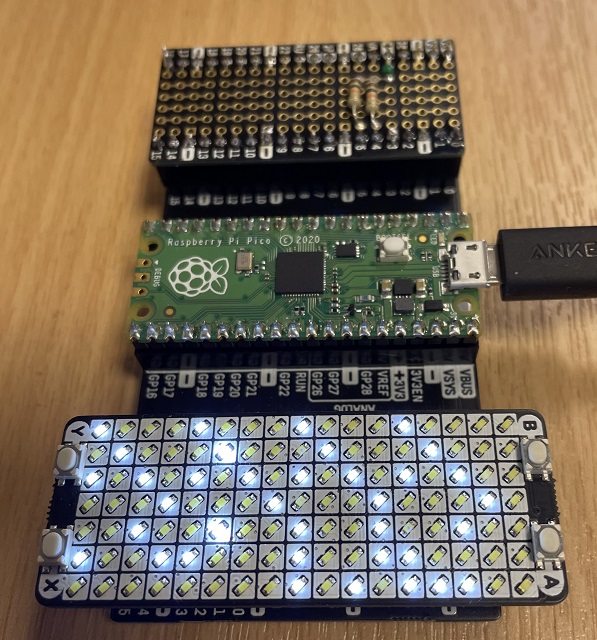
With that done, I felt that I needed some way to visualise what was being played back. Instead of playing the entire sequence through, I added a method to play a single step. Before each step, I made the LEDs for that step brighter. This made it possible to see which step was being played. In the image below, you can just make outthat the two LEDs in column 6 are brighter than the others. It is always difficult to photograph LEDs, particularly for someone like me with no talent for the art of photography.
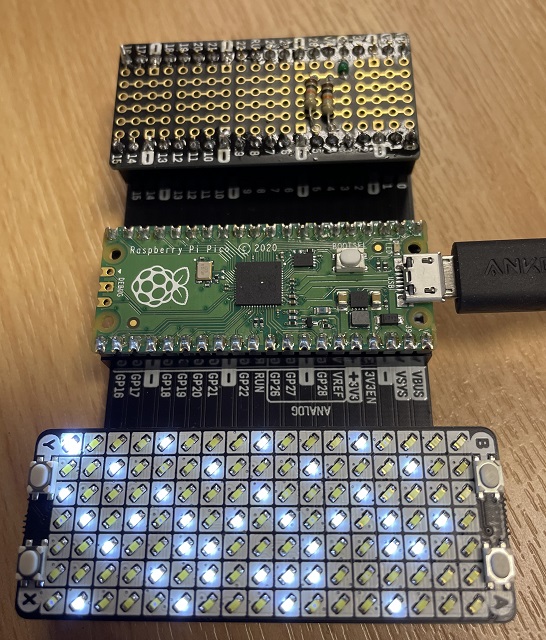
Finally, I wanted to use the buttons on the Scroll Pack to provide some way of editing when the instruments were being played. I wanted to be able to select a step on a track and turn it on or off. Rather than real time editing, I wanted to have an edit mode and a play mode. That way I could set up tracks and then play them back. In this last photograph, I am in full flight and this is a loop I have made entirely using the Scroll Pack buttons. The LED in the top left corner (step 0 of track 0) is brighter than all of the others. This is my 'cursor'. Button Y is used to move the dot to the right. It wraps back to the beginning after the 16th LED (last column not used). The X button moves down a track and goes back to 0 when it reaches the bottom row. Button B is used to toggle the state of the currently selected LED. Button A is used to enter playback mode. When it is pressed, the loop plays continously with with the notes of the current step shown brighter than the other LEDs. Press A again returns you to edit mode.
It did not take long to get used to making a quick loop. I didn't have enough inputs or outputs for instrument selection, unfortunately. That might come into a future project, probably with different components.
Setting Up
In order to hear the MIDI notes on your PC, you will need to install some software to your PC. I used Virtual Midi Piano Keyboard to view/hear the MIDI playing. You can use other software if you wish. This program is free and, importantly, allows you to choose channels and instruments using MIDI messages.
If you are using VMPK then, once installed, you will need to make sure that you set up the software to receive MIDI input. Go to the Edit menu and choose MIDI Connections. Complete as shown below,

You need the following libraries for this project. Download the mpy library for these and copy to your lib folder.
The first thing I did was make my MIDI Loop library.I saved this to my lib folder as midi_loop.py.
import usb_midi
import adafruit_midi

from time import sleep
from adafruit_midi.note_off import NoteOff
from adafruit_midi.note_on import NoteOn
from random import randint

class Loop:
    def __init__(self, midi):
        self.midi = midi
        self.tracks = [0] * 7
        # default percussion instruments
        self.ns = [35] * 7
        self.artic = 0.01
        self.delay = 0.2 - self.artic
        self.steps = 16

    # set the internote gap
    def set_artic(self, value):
        self.artic = value

    # set the length of each note
    def set_delay(self, value):
        self.delay = value

    # set the number of steps in the sequence
    def set_steps(self, value):
        self.step = value

    # set the pattern for a specific track
    def set_track(self, track, value):
        self.tracks[track] = value

    # turn on/off a specific step on a specific track
    def set_track_step(self, track, step, value):
        if value:
            self.tracks[track] |= 1 << step
        else:
            self.tracks[track] &=  ~(1 << step)

    def toggle_track_step(self, track, step):
        self.tracks[track] ^= 1 << step

    # set a note for a track (choose percussion instrument)
    def set_note(self, t, n):
        if n < 35 or n > 81: return
        if t < 0 or t >= len(self.tracks): return
        self.ns[t] = n

    # get the binary playback data as a list
    def get_note_data(self):
        return [[t >> i & 1 for i in range(self.steps)] for t in self.tracks]

    # play the loop
    def play(self):
        for i in range(self.steps):
            nons = []
            noffs = []
            for j in range(len(self.ns)):
                if self.tracks[j]>>i & 1:
                    nons.append(NoteOn(self.ns[j], 120))
                    noffs.append(NoteOff(self.ns[j], 120))
            if len(nons)>0:
                self.midi.send(nons)
            sleep(self.delay)
            if len(noffs)>0:
                self.midi.send(noffs)
            sleep(self.artic)

    def play_step(self, step):
        if step > self.steps: return
        nons = []
        noffs = []
        for j in range(len(self.tracks)):
            if self.tracks[j]>>step & 1:
                nons.append(NoteOn(self.ns[j], 120))
                noffs.append(NoteOff(self.ns[j], 120))
        if len(nons)>0:
            self.midi.send(nons)
        sleep(self.delay)
        if len(noffs)>0:
            self.midi.send(noffs)
        sleep(self.artic)
Although Adafruit has a nice library for the IS31FL3731 which includes a class for working with the Scroll Pack, I just converted my MicroPython one which has the text scrolling already done. That wasn't needed for this project but I know I will want to have a quick way to get that going in a future CircuitPython project. I saved the next program to my lib folder as scroll_pack.py. I am using the Scroll Pack inverted in this project.
from time import sleep

font = bytearray(b'\x00\x00\x00\x00\x00\x00\x00\x5f\x00\x00\x00\x07\x00\x07\x00\x14\x7f\x14'
                b'\x7f\x14\x24\x2a\x7f\x2a\x12\x23\x13\x08\x64\x62\x36\x49\x55\x22\x50\x00'
                b'\x05\x03\x00\x00\x00\x1c\x22\x41\x00\x00\x41\x22\x1c\x00\x14\x08\x3e\x08'
                b'\x14\x08\x08\x3e\x08\x08\x00\x50\x30\x00\x00\x08\x08\x08\x08\x08\x00\x60'
                b'\x60\x00\x00\x20\x10\x08\x04\x02\x3e\x51\x49\x45\x3e\x00\x42\x7f\x40\x00'
                b'\x42\x61\x51\x49\x46\x21\x41\x45\x4b\x31\x18\x14\x12\x7f\x10\x27\x45\x45'
                b'\x45\x39\x3c\x4a\x49\x49\x30\x01\x71\x09\x05\x03\x36\x49\x49\x49\x36\x06'
                b'\x49\x49\x29\x1e\x00\x36\x36\x00\x00\x00\x56\x36\x00\x00\x08\x14\x22\x41'
                b'\x00\x14\x14\x14\x14\x14\x00\x41\x22\x14\x08\x02\x01\x51\x09\x06\x32\x49'
                b'\x79\x41\x3e\x7e\x11\x11\x11\x7e\x7f\x49\x49\x49\x36\x3e\x41\x41\x41\x22'
                b'\x7f\x41\x41\x22\x1c\x7f\x49\x49\x49\x41\x7f\x09\x09\x09\x01\x3e\x41\x49'
                b'\x49\x7a\x7f\x08\x08\x08\x7f\x00\x41\x7f\x41\x00\x20\x40\x41\x3f\x01\x7f'
                b'\x08\x14\x22\x41\x7f\x40\x40\x40\x40\x7f\x02\x0c\x02\x7f\x7f\x04\x08\x10'
                b'\x7f\x3e\x41\x41\x41\x3e\x7f\x09\x09\x09\x06\x3e\x41\x51\x21\x5e\x7f\x09'
                b'\x19\x29\x46\x46\x49\x49\x49\x31\x01\x01\x7f\x01\x01\x3f\x40\x40\x40\x3f'
                b'\x1f\x20\x40\x20\x1f\x3f\x40\x38\x40\x3f\x63\x14\x08\x14\x63\x07\x08\x70'
                b'\x08\x07\x61\x51\x49\x45\x43\x00\x7f\x41\x41\x00\x02\x04\x08\x10\x20\x00'
                b'\x41\x41\x7f\x00\x04\x02\x01\x02\x04\x40\x40\x40\x40\x40\x00\x01\x02\x04'
                b'\x00\x20\x54\x54\x54\x78\x7f\x48\x44\x44\x38\x38\x44\x44\x44\x20\x38\x44'
                b'\x44\x48\x7f\x38\x54\x54\x54\x18\x08\x7e\x09\x01\x02\x0c\x52\x52\x52\x3e'
                b'\x7f\x08\x04\x04\x78\x00\x44\x7d\x40\x00\x20\x40\x44\x3d\x00\x7f\x10\x28'
                b'\x44\x00\x00\x41\x7f\x40\x00\x7c\x04\x18\x04\x78\x7c\x08\x04\x04\x78\x38'
                b'\x44\x44\x44\x38\x7c\x14\x14\x14\x08\x08\x14\x14\x18\x7c\x7c\x08\x04\x04'
                b'\x08\x48\x54\x54\x54\x20\x04\x3f\x44\x40\x20\x3c\x40\x40\x20\x7c\x1c\x20'
                b'\x40\x20\x1c\x3c\x40\x30\x40\x3c\x44\x28\x10\x28\x44\x0c\x50\x50\x50\x3c'
                b'\x44\x64\x54\x4c\x44\x00\x08\x36\x41\x00\x00\x00\x7f\x00\x00\x00\x41\x36'
                b'\x08\x00\x10\x08\x08\x10\x08\x00\x00\x00\x00\x00')

_f = 0
_b = bytearray(145)
orientation = 1

class Matrix:
    def __init__(self, i2c):
        self.i2c = i2c
        while not self.i2c.try_lock():
            pass
        self._w(253, 11)
        sleep(0.1)
        self._w(10, 0)
        sleep(0.1)
        self._w(10, 1)
        sleep(0.1)
        self._w(0, 0)
        self._w(6, 0)
        for bank in [1,0]:
            self._w(253, bank)
            self._w([0] + [255] * 17)
        self.clear()
        self.show()

    def _w(self, *args):
        if len(args) == 1: args = args[0]
        self.i2c.writeto(116, bytes(args))

    def clear(self):
        global _b
        del _b
        _b = bytearray(145)

    def fill(self, v):
        global _b
        del _b
        _b = bytearray([v]*145)

    def show(self):
        global _f
        _f = not _f
        self._w(253, _f)
        _b[0] = 36
        self._w(_b)
        self._w(253, 11)
        self._w(1, _f)

    def set_pixel(self,col, row, brightness):
        global _b
        _b[self._pixel_addr(col, row)] = brightness

    def get_pixel(self, col, row):
        global _b
        return _b[self._pixel_addr(col, row)]

    def _pixel_addr(self, x, y):
        y =  (7 - (y + 1))*(1 - orientation) + orientation*y
        x = (17 - (x + 1))*orientation + (1 - orientation)*x
        if x > 8:
            x = x - 8
            y = 6 - (y + 8)
        else:
            x = 8 - x
        return (x * 16 + y) + 1

    def scroll(self, txt, delay, v):
        global _b
        msg = bytearray([0]*17)
        for c in txt:
            msg += bytearray(b'\x00')
            msg += font[(ord(c)-32)*5:(ord(c)-32)*5+5]
            msg += bytearray(b'\x00')
        msg += bytearray([0]*17)
        for i in range(len(msg)-17):
            m = msg[i:i+17]
            for y in range(7):
                for x in range(17):
                    if m[x]>>y & 1:
                        self.set_pixel(x,y,v)
                    else:
                        self.set_pixel(x,y,0)
            self.show()
            sleep(delay)
The last program is the one that does the work. I have left in the test values I used when I first started doing this. Uncomment those lines or rewrite them if you want to hard code something to get started with. The set_note method is where you choose the percussion instrument you want for each track.
import board
import busio
import usb_midi
import adafruit_midi
from midi_loop import Loop
from scroll_pack import Matrix
from time import sleep
from digitalio import DigitalInOut, Pull, Direction

def show_loop(note_data):
    for i in range(7):
        for j in range(16):
            display.set_pixel(j, i, note_data[i][j] * 32)

def show_step(note_data, s):
    for i in range(7):
        display.set_pixel(s, i, note_data[i][s] * 255)
        if s > 0:
            display.set_pixel(s - 1, i, note_data[i][s - 1] * 32)
        else:
            display.set_pixel(len(note_data[i]) - 1, i, note_data[i][len(note_data[i]) - 1] * 32)

# function to read buttons into a binary pattern, 1 for pressed
def read_btns(btn_list):
    result = 0
    for i, b in enumerate(btn_list):
        result +=  (b.value^1)<<i
    return result

# tells if a button is pressed
def pressed(pattern, b):
    return pattern>>b & 1

midi = adafruit_midi.MIDI(
    midi_in=usb_midi.ports[0], in_channel=0, midi_out=usb_midi.ports[1], out_channel=9
)

i2c = busio.I2C(board.GP5, board.GP4)
display = Matrix(i2c)

loop = Loop(midi)

# uncomment for quick test data
#loop.set_track(0, 69905)
#loop.set_track(1, 8738)
#loop.set_track(2, 87381)
#loop.set_track(3, 34952)
#loop.set_track(4, 18724)
#loop.set_track(5, 71961)
#loop.set_track(6, 29952)

# define percussion instruments for each track
loop.set_note(0, 35)
loop.set_note(1, 78)
loop.set_note(2, 48)
loop.set_note(3, 53)
loop.set_note(4, 56)
loop.set_note(5, 71)
loop.set_note(6, 72)


# set up buttons
btn_pins = [board.GP12, board.GP13, board.GP14, board.GP15]
btns = [DigitalInOut(p) for p in btn_pins]
for b in btns:
    b.switch_to_input(pull = Pull.UP)

while True:
    previous = 0
    tick = 0
    spot = 255
    x = 0
    y = 0
    # 0 - editor, 1 - playback
    mode = 0
    while mode == 0:
        reading = read_btns(btns)
        if reading != previous:
            if pressed(reading, 3):
                x += 1
                if x > 15: x = 0
            if pressed(reading, 2):
                y += 1
                if y > 6: y = 0
            if pressed(reading, 1):
                loop.toggle_track_step(y, x)
            if pressed(reading, 0):
                mode = 1
        previous = reading
        show_loop(loop.get_note_data())
        display.set_pixel(x, y, 255)
        display.show()
    show_loop(loop.get_note_data())
    step = 0
    while mode:
        reading = read_btns(btns)
        if reading != previous:
            if pressed(reading, 0):
                mode = 0
        previous = reading
        show_step(loop.get_note_data(), step)
        display.show()
        loop.play_step(step)
        step = (step + 1) % 16
I am really pleased with the results of this project. It is not musical genius but, after 5 minutes of mucking about, it's really easy to make a cool drum loop. Ideally, there would be extra inputs to the circuit to control tempo and choose instruments. With a different display, the number of tracks might be increased. I also thought that it might be nice to use the Pico file system to save and load the data for a drum loop. There is lots of scope to adapt the original idea. It would also be possible to use audio files and play those back over I2S using the Pimoroni audio pack instead of using the MIDI. If only I knew a beatboxer who could record some samples for me to use...