Raspberry Pi Pico
MicroPython - Basics
MicroPython - More Involved
MicroPython - Pico W
MicroPython - micro:bit
MicroPython - Projects
CircuitPython - Some Basics
CircuitPython - HID Adventures
CircuitPython - Experiments
Other Pages
![]()


Raspberry Pi Pico
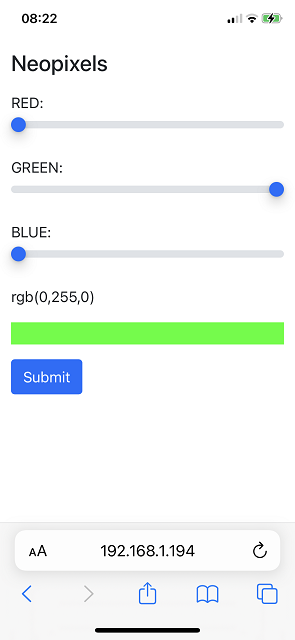
Controlling Neopixels
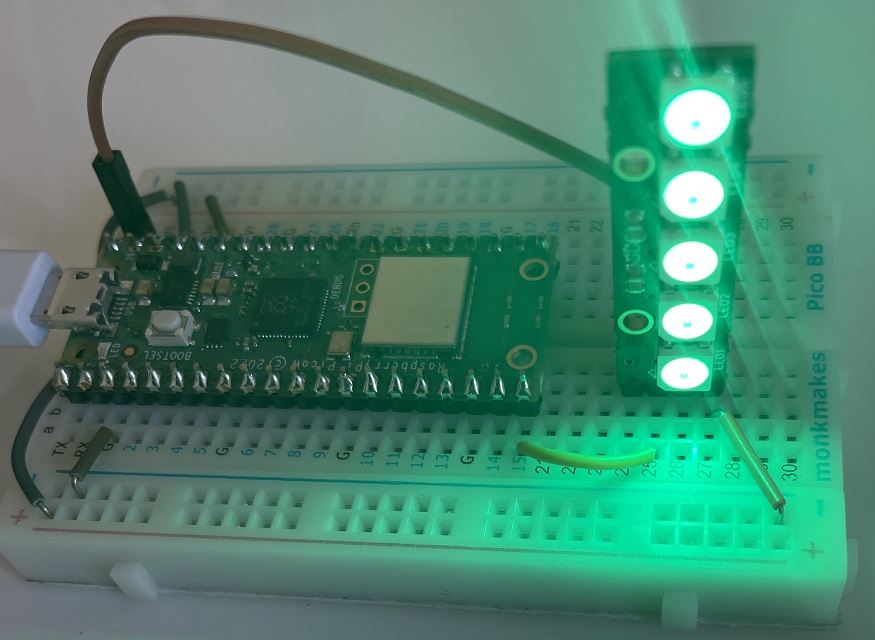
I wanted to make a web page that could be used to control some Neopixels connected to a Pico W. I started by setting up a 5 pixel stick of Neopixels connected to GP15 on the Pico W. The power connection is going to VBUS on the Pico W.
I then designed a web page using Bootstrap and jQuery. I tested this on my PC until I was happy. This being a little longer than my previous pages for the Pico W, I decided to put it in a separate file and stuff it in the lib folder. I called that file, page.py.
html = """
<!DOCTYPE html>
<html lang="en">
<head>
<title>PicoW Neopixels</title>
<meta charset="utf-8">
<meta name="viewport" content="width=device-width, initial-scale=1">
<link href="https://cdn.jsdelivr.net/npm/bootstrap@5.1.3/dist/css/bootstrap.min.css" rel="stylesheet">
<script src="https://cdn.jsdelivr.net/npm/bootstrap@5.1.3/dist/js/bootstrap.bundle.min.js"></script>
<script src="https://ajax.googleapis.com/ajax/libs/jquery/3.6.0/jquery.min.js"></script>
<script>
$(document).ready(function(){
$("#r").val(%d);
$("#g").val(%d);
$("#b").val(%d);
UpdateDisplay();
$("input").change(function(){
UpdateDisplay();
});
function UpdateDisplay()
{
var r = $("#r").val();
var g = $("#g").val();
var b = $("#b").val();
var c = "rgb(" +r + "," + g + "," +b + ")"
$("#coltext").text(c);
$("#colpick").css("background-color", c);
}
});
</script>
</head>
<body>
<div class="container mt-3">
<h2>Neopixels</h2>
<form action="index.htm" method="GET">
<div class="mb-3 mt-3">
<label for="r">RED:</label>
<input type="range" class="form-range" min="0" max="255" name="r" id="r">
</div>
<div class="mb-3">
<label for="g">GREEN:</label>
<input type="range" class="form-range" min="0" max="255" name="g" id="g">
</div>
<div class="mb-3">
<label for="b">BLUE:</label>
<input type="range" class="form-range" min="0" max="255" name="b" id="b">
</div>
<div class="mb-3">
<p id="coltext">0,0,0</p>
<p id="colpick" style="background-color: black;"> </p>
</div>
<button type="submit" class="btn btn-primary">Submit</button>
</form>
</div>
</body>
</html>
"""
The web page is a form with 3 sliders, one for each of the colour channels. Submitting the form reloads the page with the form data encoded in the URL. Setting the form's method to GET does that. There are 3 placeholders for Python string formatting. These are the amounts of red, green and blue to show on the web page form. These will be read from the Neopixel on the Pico W. If the form has been submitted, the details of the requested colour will be processed and then set on the form when it reloads.
Here is the code to handle all of that,
from time import sleep
from network import WLAN, STA_IF
from secrets import secrets
from machine import Pin
from page import html
from neopixel import NeoPixel
import uasyncio as asyncio

wlan = WLAN(STA_IF)

pin = Pin(15, Pin.OUT)
np = NeoPixel(pin, 5)
np.fill((0,0,0))
np.write()


def connect():
    wlan.active(True)
    wlan.config(pm = 0xa11140)
    wlan.connect(secrets["ssid"], secrets["password"])

    # try to connect or fail
    max_wait = 10
    while max_wait >0:
        if wlan.status() <0 or wlan.status()>=3:
            break
        max_wait -= 1
        print("Waiting for connection...")
        sleep(1)

    # connection error
    if wlan.status() != 3:
        return False
    else:
        status = wlan.ifconfig()
        print("Connected to", secrets["ssid"], "on", status[0])
        print()
        return True

async def serve_client(reader, writer):
    global t, count
    request_line = await reader.readline()
    print("Request:", request_line)

    # skip HTTP header
    while await reader.readline() != b'\r\n':
        pass
    # check for submitted from
    req = str(request_line)
    rr = req.find("r=")
    if rr == -1:
        r, g, b = np[0]
    else:
        gg = req.find("&g=")
        bb = req.find("&b=")
        spc = req.find(" HTTP")
        r = int(req[rr + 2:gg])
        g = int(req[gg+3:bb])
        b = int(req[bb+3:spc])
        np.fill((r,g,b))
        np.write()
    response = html % (r, g, b)
    writer.write('HTTP/1.0 200 OK\r\nContent-type: text/html\r\n\r\n')
    writer.write(response)

    await writer.drain()
    await writer.wait_closed()
    print("Client disconnected.")

async def main():
    print("Connecting to network.")
    connect()
    print("Setting up server.")
    asyncio.create_task(asyncio.start_server(serve_client, "0.0.0.0", 80))
    print("Done.")
    while True:
        await asyncio.sleep(0.25)

try:
    asyncio.run(main())
finally:
    asyncio.new_event_loop()
The way the webserver works is to look at the request from a client and deliver the appropriate page. As the programmer, you need to do the work of processng the string you receive and deciding what to do. All I have done here is to write a web page that sticks relevant data into that string. If you wanted to get the Pico W to deliver a navgiable web site, you would look at the URL you receive and make your response change accordingly.
I have used the asynchronous web server approach here because I had thought that I wanted to be getting the Pico W to do something in between delivering the pages. In the end, I didn't do that. The loop at the end could be used for that in an adaptation of this project. Alternatively, use the simpler approach from the first web server page in this section.
This is what the web page looks like on a mobile phone. It works fine on a PC too.