Other
Arduino - LED Projects
Arduino - Buzzer Projects
Arduino - Midi Projects
Arduino - Microview
Arduino - Other Projects
Arduino - Visual Basic.NET
Arduino - Tim's Projects
Arduino - Links
![]()


Pushbuttons & LEDs
Introduction
Using pushbuttons is another way to make your circuit interactive and give a user control over how the components behave.
You Will Need
- 1 x LED
- 1 x 330 Ohm Resistor
- 1 x 10 KOhm Resistor
- 1 x Pushbutton
- Jumper Wires
Making The Circuit
The diagram shows how the circuit should look.
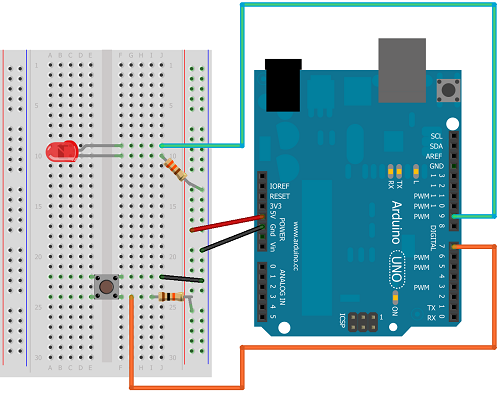
The 10Kohm resistor is connected from the 5V rail to the button pin we are reading from.
Programming The Arduino
Here is the code you will need for the basic control of this circuit,
int ledPin = 9;

int buttonPin = 7;


void setup()

{

  pinMode(ledPin, OUTPUT);

  pinMode(buttonPin, INPUT);

}


void loop()

{

  // read from the button pin

  int button = digitalRead(buttonPin);

  if (button==HIGH)

  {

    digitalWrite(ledPin,HIGH);

  }

  else

  {

    digitalWrite(ledPin, LOW);

  }

}
When you upload this program to the Arduino, you will notice that the LED starts on. When you press the button, the LED should switch off. The double equals (==) in the IF statement is not a mistake - it is the operator for comparison in most languages from the C family..
You may also have noticed that the value we read from the pushbutton, HIGH or LOW is the value we are writing to the LED pin. The following code achieves the same effect without requiring the use of the IF statement.
int ledPin = 9;

int buttonPin = 7;


void setup()

{

  pinMode(ledPin, OUTPUT);

  pinMode(buttonPin, INPUT);

}


void loop()

{

  // read from the button pin

  int button = digitalRead(buttonPin);

  digitalWrite(ledPin, button);

}
Another thing to notice with this setup is that we have made a button which turns the light off when we press it. This means that the circuit is complete until we press the button. In other words, we can say that the button is push-to-break.
Challenge
Adapt the program that contains the IF statement so that pressing the button lights the LED rather than turns it off.
Alternative Setup
You can set the circuit up so that the we read a LOW from the button when it isn't pressed. This would turn the button into a push-to-make button. To do that, we change the arrangement of the connections to the button.
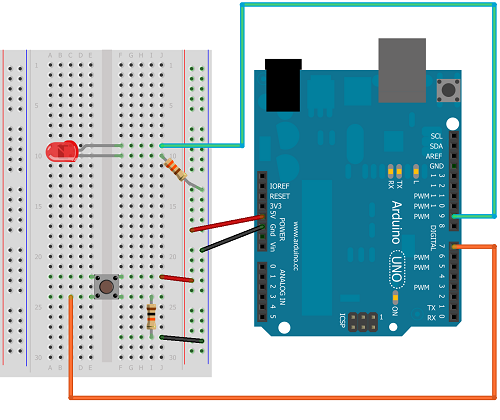
Now we have the resistor connected to GND and we are reading from one of the button pins that is connected to GND. Pressing the button turns the light on if you use the following code,
int ledPin = 9;

int buttonPin = 7;


void setup()

{

  pinMode(ledPin, OUTPUT);

  pinMode(buttonPin, INPUT);

}


void loop()

{

  // read from the button pin

  int button = digitalRead(buttonPin);

  digitalWrite(ledPin, button);

}
Registering Single Pushes Of The Button
In some projects, you may want something to happen when a button is held down. Often though, you just want to do something once when the button is pressed. We can make these buttons work that way if we change the way that the code works.
Set up the circuit as you did at the beginning of this page,
The code you need to do this is as follows,
int ledPin = 9;

int buttonPin = 7;

int lastButtonState = HIGH;

int ledState = HIGH;


void setup()

{

  pinMode(ledPin, OUTPUT);

  pinMode(buttonPin, INPUT);

}


void loop()

{

  // read from the button pin

  int buttonState = digitalRead(buttonPin);

  // if the button is not in the same state as the last reading

  if (buttonState==LOW && buttonState!=lastButtonState)

  {

    // change the LED state

    if (ledState==HIGH)

    {

      ledState = LOW;

    }

    else

    {

      ledState = HIGH;

    }

  }

  digitalWrite(ledPin, ledState);

  // store the current button state

  lastButtonState = buttonState;

  // add a delay to avoid multiple presses being registered

  delay(20);

}
We need additional variables to keep track of the state of the LED (HIGH or LOW, on or off) and so that our program knows what was happening with the button on the previous loop. The delay at the end of the loop is to ensure that the button press is only registered once. If you remove the delay, you will find that the LED will quickly flicker on and off. A similar approach to this is used when writing games for the XBox360 using the controller. There are times when you want to work with the button when it is being pressed continuously, sometimes you want to deal with each button press separately.
Another approach to this is called Debouncing. Search for this with the word Arduino in your search and you will find some examples of code that will help. There is a slight difference in how the delay is used that might work better for some projects.
Challenges
Set up a circuit with 2 pushbuttons and a single LED. Have one button used to turn on the LED and a second button to turn it off. Write your code so that pressing both buttons at the same time has no effect.
Create a circuit with 4 LEDs and a pushbutton. Light the first LED on the first button press. Light the first two LEDs when the button is pressed for the second time. Light the first three LEDs on the third button press. Light all of the LEDs when the button is pressed for the fourth time. The next button press should turn all of the LEDs off and allow the cycle to start again.