Other
Arduino - LED Projects
Arduino - Buzzer Projects
Arduino - Midi Projects
Arduino - Microview
Arduino - Other Projects
Arduino - Visual Basic.NET
Arduino - Tim's Projects
Arduino - Links
![]()


Simon Game
Introduction
This project is based on a handheld electronic game that was developed in the 1970s. The game consists of 4 coloured buttons. The buttons light up when they are pressed and a different tone is played for each button. In each round of the game, the microcontroller lights up a sequence of buttons. The player has to press the buttons in the same sequence. After each round, the length of the sequence is increased by 1.
The original game is shown below,

You Will Need
- 4 x LEDs
- 4 x 330 Ohm Resistors
- 4 x Pushbutton
- 4 x 10 KOhm Resistors
- 1 x Piezo Buzzer
- Jumper Wires
Having different coloured buttons and different coloured LEDs is a bonus for making this game. The concept still works if your buttons and LEDs are all the same.
Optional Parts
A nice part to use for this circuit is the Sparkfun LED tactile button. A breakout board is available that makes this a breadboard-friendly component. These parts are shown below,
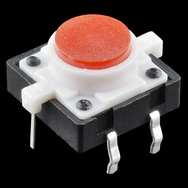
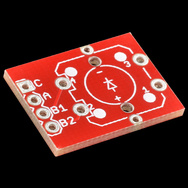
If you do get these buttons and breakout boards, you will have a bit of soldering to do. The buttons need to be soldered to the breakout board along with 4 headers. It does make for a tidier breadboard.
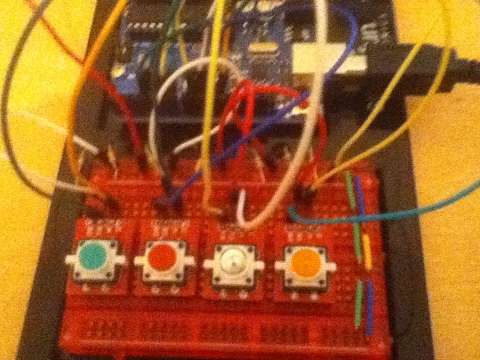
Making The Circuit
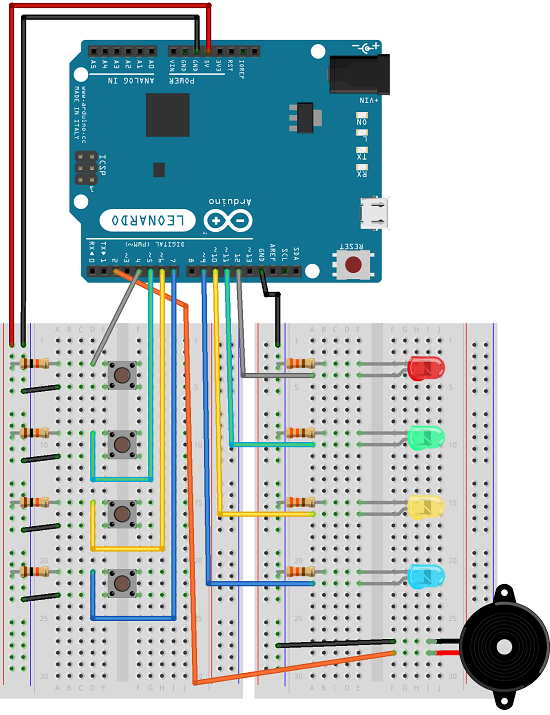
When you are connecting up this circuit, you want to try to keep the clutter to a minimum around the buttons. If necessary, change the pins that you use and amend the sketch accordingly.
Programming The Arduino - Wiring Test
It's always a good idea to test parts of your circuit before embarking on more complex programming. Here is a simple sketch to check that the buttons and LEDs are all wired correctly. This sketch lights an LED whilst its corresponding button is pressed.
int led[] = {12,11,10,9};

int button[] = {4,5,6,7};


void setup()

{

  for (int i=0;i<4;i++)

  {

    pinMode(led[i], OUTPUT);

    pinMode(button[i], INPUT);

  }

}


void loop()

{

  for (int i=0;i<4;i++)

  {

    if (digitalRead(button[i])==LOW)

    {

      digitalWrite(led[i], HIGH);

    }

    else

    {

      digitalWrite(led[i], LOW);

    }

  }

}
Programming The Arduino - Buzzer Test
In the Simon game, there is a buzzer tone associated with each LED/button. This sketch checks how those tones sound.
int led[] = {12,11,10,9};

int button[] = {4,5,6,7};

int buzzerpin = 2;

int notes[] = {659,880,330,554};


void setup()

{

  for (int i=0;i<4;i++)

  {

    pinMode(led[i], OUTPUT);

    pinMode(button[i], INPUT);

  }

}


void loop()

{

  for (int i=0;i<4;i++)

  {

    if (digitalRead(button[i])==LOW)

    {

      digitalWrite(led[i], HIGH);

      tone(buzzerpin, notes[i], 500);

      delay(500);


    }

    else

    {

      digitalWrite(led[i], LOW);

    }

  }

}
In this sketch, pressing a button results in the correct LED being lit and a suitable tone being played. The tones are the same notes as in the original game which were chosen to sound harmonious in any order. There is a delay after each tone. Nothing prevents the tone from playing when the button is held down but everything should sound nice if you just do single presses.
Programming The Arduino - Basic Game
This is far from perfect but sufficient to allow the game to be played.
int led[] = {12,11,10,9};

int button[] = {4,5,6,7};

int buzzerpin = 2;

int notes[] = {659,880,330,554};

int turn = 0;

int sequence[100];

int usersequence[100];

int seqlength = 0;

boolean played = false;

void setup()

{

  //set pin modes

  for (int i=0;i<4;i++)

  {

    pinMode(led[i], OUTPUT);

    pinMode(button[i], INPUT);

  }

  pinMode(buzzerpin, OUTPUT);

  //set up the random number generator

  randomSeed(analogRead(0));

  //establish the random sequence

  for (int i =0;i<99;i++)

  {

    sequence[i] = random(0,4);

  }

}


void loop()

{

  if (turn==0)

  {

    win();

    turn =turn + 1;

  }

  if (seqlength==0 && played==false)

  {

    // play the pattern for the user

    playsequence(turn);

    played = true;

  }

  else if (seqlength==turn)

  {

    // user has entered their pattern

    win();

    played = false;

    turn = turn + 1;

    seqlength = 0;

  }

  else

  {

    // user still entering their pattern

    for (int i=0;i<4;i++)

    {

      if (digitalRead(button[i])==LOW)

      {

        usersequence[seqlength] = i;

        if (usersequence[seqlength]!=sequence[seqlength])

        {

         loss();

        }

        else

        {

        seqlength = seqlength + 1;

        digitalWrite(led[i], HIGH);

        tone(buzzerpin, notes[i], 500);

        delay(500);

        digitalWrite(led[i], LOW);

        }

      }

    }

  }

}


void win()

{

  for (int j=0;j<4;j++)

  {

    for (int i=0;i<4;i++)

    {

      tone(buzzerpin, notes[i], 50);

      digitalWrite(led[i], HIGH);

      delay(50);

      digitalWrite(led[i], LOW);

    }

  }

  delay(1000);

}


void loss()

{

  tone(buzzerpin, 131, 500);

  delay(1500);

  turn=0;

  seqlength = 0;

  played = false;

  setup();

}


void playsequence(int t)

{

  for (int i =0;i<t;i++)

  {

    tone(buzzerpin, notes[sequence[i]], 500);

    digitalWrite(led[sequence[i]], HIGH);

    delay(500);

    digitalWrite(led[sequence[i]], LOW);

    delay(200);

  }

}
The subroutines win() and loss() are used to play tunes or notes when the user gets the sequence correct or fails to do so. Additionally, the loss subroutine sets the variables to their starting value so that the game begins again.
The playsequence() procedure is used to play the sequence up to the correct point.
Challenges
The instructions on this page get you as far as having something that can be played. There are still some issues though. The tune that is played at the start, or when a correct sequence is entered, is not the tune from the original game. Hunt around enough and you could find the real tune.
There are no buttons or LEDs being used to allow the user to set up the game. The original game had several modes and could be restarted when the user wanted. You could add a little more functionality to the circuit.
There is a bit of a problem with the button pressing logic. The sketch checks the state of the buttons, if the user holds down a button for more than half a second, the code here would treat that as another button press. The moment to trap is the change in button state from HIGH to LOW. Fixing this flaw would be essential if you were soldering this project up for an actual game.
There is a lot of tinkering to be done with the timings of various parts of this sketch. The values used here are fine for development but don't necessarily offer the best user experience. There is a lot you coud do to enhance the flow of this game.