Other
Arduino - LED Projects
Arduino - Buzzer Projects
Arduino - Midi Projects
Arduino - Microview
Arduino - Other Projects
Arduino - Visual Basic.NET
Arduino - Tim's Projects
Arduino - Links
![]()


Wii Nunchuck Mouse
Introduction
It would be useful to complete the project, VB Wii Nunchuck before coming back to this page. The information you can get about the way the Nunchuck works would be useful. Bear in mind that the Arduino Uno is used for that project and this project requires an Arduino Leonardo or one of the more recent Arduino boards that can emulate a mouse or keyboard.
This project uses the mouse library to control the PC cursor using the analogue joystick on the Nunchuck.
You Will Need
- 1 x Arduino Leonardo
- 1 x WiiChuck Adapter
- 1 x Wii Nunchuck
- 1 x Led
- 1 x 300 Ohm Resitor
- 1 x Pushbutton
- 1 x Rocker Switch
- 2 x 10 KOhm Resistor
- Jumper Wires
The rocker switch could be replaced with a pushbutton if you look at the page on pushbuttons and how to register a single press of the button. The sketch on this page would have to be modified to accommodate that change.The pins on rocker and toggle switches tend to be too large to push into a breadboard. You can connect them up with crocodile clips or solder some jumper wires to them.
Making The Circuit
The Arduino Leonardo is not shown in the image. Also missing is the rocker switch (parts not available in Fritzing at the time of writing). The SDA and SCL ports on the Leonardo are not in the same place as on the Uno. On the Leonardo, these ports are D2 and D3. They are also broken out to separate headers which are helpfully labelled.
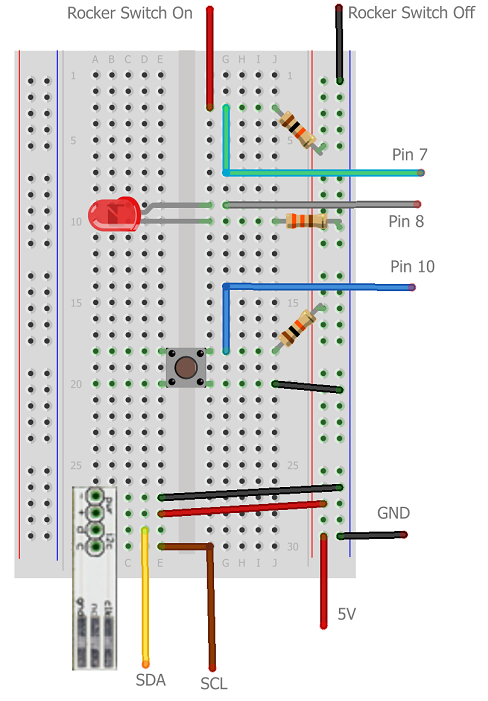
When you connect the Nunchuck to the adapter, the transparent clip is pointing downwards (assuming you are using an official Nunchuck).
Programming The Arduino
You will need to download a library class to work with the Nunchuck. The version used for this sketch can be copied from http://playground.arduino.cc/Main/WiiChuckClass. For this project, you want the one that is labelled as being updated for Arduino 1.0. Do not choose the one that sets the power pins - that is great for the Uno but would need adjusting for the Leonardo. This class should be copied into Notepad and saved as WiiChuck.h. When you have copied the sketch below, close it down, place the .h file in its folder and then reopen the sketch. You should see 2 tabs in the Arduino IDE.
The Rocker switch is used to turn the Mouse functionality on and off - that way you can keep control of the mouse on the PC. The LED is an indicator to let you know that the Nunchuck is supposed to be controlling the mouse. The pushbutton is to allow you to calibrate the joystick.
#include "Wire.h"

#include "WiiChuck.h"


const int rocker = 7;

const int led = 8;

const int centre = 10;


// whether or not mouse is to be used

boolean mouseyes = false;

WiiChuck chuck = WiiChuck();

// range of movement in pixels

const int range = 50;

// limit to negative movement

const int minimum = (int)range/2*-1;

// limit to positive movement

const int maximum = (int)range/2;

// threshold for movement

const int threshold = 10;


void setup()

{

  pinMode(rocker, INPUT);

  pinMode(led, OUTPUT);

  pinMode(centre, INPUT);

  // initialise the nunchuck

  chuck.begin();

  chuck.update();

  // enable mouse functions

  Mouse.begin();

}


void loop()

{

  // check the state of the rocker switch

  if(digitalRead(rocker)==LOW)

  {

    digitalWrite(led, HIGH);

    mouseyes = true;

  }

  else

  {

    digitalWrite(led, LOW);

    mouseyes = false;

  }

  // centre joystick

  if (digitalRead(centre)==LOW)

  {

    chuck.update();

    chuck.calibrateJoy();

  }

  if (mouseyes)

  {

    // process nunchuck

    chuck.update();

    int dx = (int)chuck.readJoyX();

    int dy = (int)chuck.readJoyY();

    // ignore small changes in position

    if(abs(dx)<threshold)

    {

      dx = 0;

    }

    if (abs(dy)<threshold)

    {

      dy = 0;

    }

    // map to smaller range

    dx = constrain(dx,-90,90);

    dy = constrain(dy,-90,90);

    dx = map(dx, -90,90,minimum,maximum);

    dy = map(dy, -90,90,minimum, maximum);

    // make the mouse movement

    Mouse.move(dx,-dy,0);

    // process clicks

    if(chuck.buttonZ==1)

    {

      Mouse.press(MOUSE_LEFT);

    }

    else

    {

      Mouse.release(MOUSE_LEFT);

    }

    if(chuck.buttonC==1)

    {

      Mouse.press(MOUSE_RIGHT);

    }

    else

    {

      Mouse.release(MOUSE_RIGHT);

    }

    // a small delay is needed to avoid filling the serial buffer

    delay(5);

  }

}
It took a bit of experimentation to be able to read and process the joystick movements to create usable mouse movements on the screen. You may have to tweak a few values. The Nunchuck is pretty sensitive and this is reflected in the sketch. The code is a little inefficient in that some of the separate IF statements could have been collapsed into each other. Keeping them separate is a good idea when you are trying to get things working.
In the main loop, several things happen. First the rocker switch is examined to see whether the mouse should be moved and to turn the LED on or off to indicate this state. The next block calibrates the joystick - you need to hold the nunchuck still and leave the joystick alone when you press this.
If mouse movement is turned on, the sketch reads the values from the X and Y axes of the joystick. If you wave the nunchuck around, small changes are registered. If the reading is between -10 and 10, it is ignored - the amount to move the mouse is set to 0. This means you can't move the mouse simply by resting your finger on the joystick. It also allows you to move along one axis when you want to. The constrain() function stops the reading falling outside of a range from -90 to 90. These values are then mapped onto the range -25 to 25. If you increase the value of the constant, the mouse will be moved further when the joystick is pushed all the way along one of its axes. The two buttons on the nunchuck are then read. These are used to allow left and right clicking of the mouse. The delay at the end of the loop prevents the serial buffer from being filled. It is probably possible to reduce this a little if you find the mouse sluggish.
The values used in this sketch worked for me using full HD resolution. At different resolutions, the values may need to be adjusted to create a nicer experience.
Challenges
Once you have had a play with the mouse functionality, the obvious place to look is at the accelerometer. This is a little tricky. Like the joystick it is a sensitive creature. Very small movements return some largish values. It's not as easy to centre as the joystick - it's very hard to hold the nunchuck at a specific angle so that any of the axes are stable. You will need to look at changes in readings between executions of the loop to determine how far to move. One approach is to only read the accelerometer when one of the pushbuttons is held down, this allows the user to stop the cursor from moving without having to perform a balancing act with their hand. You would probably have to abandon the right mouse clicking or do this when the left click button is held down for a few seconds.