Other
Arduino - LED Projects
Arduino - Buzzer Projects
Arduino - Midi Projects
Arduino - Microview
Arduino - Other Projects
Arduino - Visual Basic.NET
Arduino - Tim's Projects
Arduino - Links
![]()


Microview & Nunchuck
Introduction
This project is concerned with using the Wii Nunchuck as an input device for an Arduino project with a display. Clearly this would be a suitable first step if you are thinking of making a little game to run on the Microview.
Having the OLED display available in the project allows us to output information that helps us to calibrate our nunchuck and see the numeric values that the Arduino is reading from it.
You Will Need
- Microview
- Wiichuck Adapter
- Nunchuck
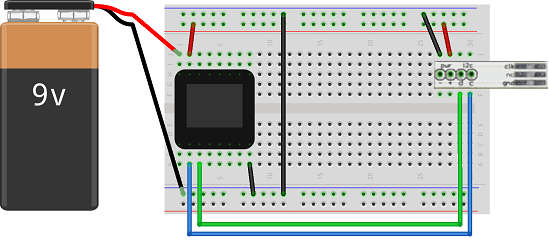
Making The Circuit
The circuit is shown with a 9V battery. The USB connection for the programmer board or your FTDI cable would provide power when uploading and testing.
Programming The Arduino
You need the Microview library for this project.
You also need the Wiichuck class. You can find it on the following page. You need version 1.0 and not the version that reassigns the power pins. Save the file with a text editor and call it WiiChuck.h. Create a WiiChuck folder in your libraries folder and add the file there.
Here is the basic code for getting started. The accelerometer output is ignored here but easy to add if you intend to make use of it. In this program, I am concentrating on the analog joystick and the two buttons.
#include <Wire.h>

#include <MicroView.h>

#include <WiiChuck.h>

WiiChuck chuck = WiiChuck();


void setup() {

  // initialise the nunchuck

  chuck.begin();

  chuck.update();

  uView.begin();

  uView.clear(ALL);

  uView.setFontType(0);

}


void loop() {

  // process nunchuck

  chuck.update();

  uView.clear(PAGE);

  uView.setCursor(0, 0);

  uView.setFontType(0);

  uView.print("x: ");

  uView.print((int)chuck.readJoyX());

  uView.setCursor(0,8);

  uView.print("y: ");

  uView.print((int)chuck.readJoyY());

  uView.setCursor(0,16);

  uView.print("Z: ");

  uView.print((int)chuck.buttonZ);

  uView.setCursor(0,24);

  uView.print("C: ");

  uView.print((int)chuck.buttonC);

  uView.display();

  delay(50);


}
Upload and test the code. The values read from the Nunchuck should be displayed nicely on the screen. You might notice that x and y values do not rest at 0 when the joytick is centred. A small tweak to the library and this can be fixed.
The lines in the library that define the DEFAULT_ZERO_JOY_X and DEFAULT_ZERO_JOY_Y are the numbers that determine the centre position. Change these, save and re-upload until the joystick sits at or around 0 when centred. I find that the x value floats between 0 and -1 on my Nunchuck - you might have a different experience.
Challenges
Once you have the Nunchuck working and calibrated, you need to think of something that you want to do with it.