Other
Arduino - LED Projects
Arduino - Buzzer Projects
Arduino - Midi Projects
Arduino - Microview
Arduino - Other Projects
Arduino - Visual Basic.NET
Arduino - Tim's Projects
Arduino - Links
![]()


Visual Basic Serial Monitor
Introduction
The Arduino is connected to the PC via a USB port. Visual Basic can be programmed to receive or send data across that port. There already is a Serial Port Monitor in the Arduino programming IDE and it does the job you need for the most part. The purpose of this page is to replicate at least the same functionality using a Visual Basic program. If data can be sent or received to the Arduino using another programming, that opens up some interesting possibilities. This page is all about the principles.
You Will Need
- Arduino connected to USB port.
- Visual Basic 2010 Express Version
Making The Circuit
There is no need to start with any components connected up - all we need to do is see if we can connect to the Arduino port and read data from it.
Programming The Arduino
To start off, we'll just write a program that sends some data to the Serial port regularly.
void setup()

{

 Serial.begin(9600);

}

void loop()

{

  Serial.println(millis());

  delay(100);

}
Making The Visual Basic Program
You will need to start a new Windows Forms Project and design a form to look like this,
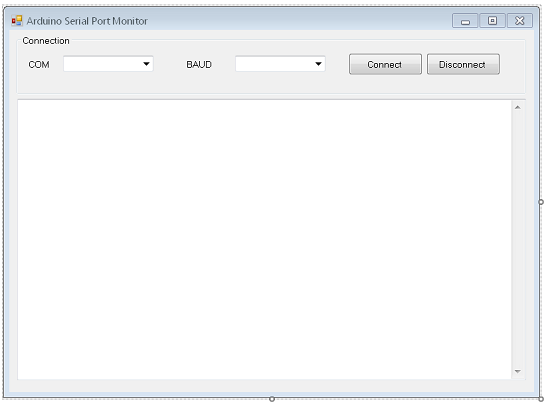
At the top of the form, you have a GroupBox. Inside the GroupBox, there are 2 ComboBoxes, each with its own Label. The ComboBoxes are called cmbPort and cmbBaud. There are 2 Buttons, one called btnConnect and the other called btnDisconnect. Below the GroupBox, there is a large TextBox. It has been named txtIn and has its Multiline property set to true and its Scrollbars property set to Vertical.
Starting Off
At the very top of the code window, you will need to import the references to the serial port. You do this with the following line,
Imports System.IO.Ports
You will also need a global variable to represent the serial port we connect to. You do this with the following statement,
Dim WithEvents sp As New SerialPort
The next set of statements define a few procedures we need to use. First you have a subroutine to list the serial ports that are available. Depending on the peripherals you have attached to the PC, this could be a few. There is also a procedure to add text to the end of the text box.
Private Sub GetSerialPortNames()

   For Each sport As String In My.Computer.Ports.SerialPortNames

      cmbPort.Items.Add(sport)

   Next

End Sub


Sub ShowString(ByVal myString As String)

   txtIn.AppendText(myString)

End Sub


Delegate Sub myMethodDelegate(ByVal [text] As String)

Dim myDelegate As New myMethodDelegate(AddressOf ShowString)
Double click on an empty part of the form and the code window should pop up with headers for the Form_Load event. The following code will populate the ComboBoxes.
Private Sub Form1_Load(sender As System.Object, e As System.EventArgs) Handles MyBase.Load

   Dim BaudRates() As String = {"300", "1200", "2400", "4800", "9600", "14400", "19200", "28800", "38400", "57600", "115200"}

   cmbBaud.Items.AddRange(BaudRates)

   cmbBaud.SelectedIndex = 4

   Try

      GetSerialPortNames()

      cmbPort.SelectedIndex = 0

   Catch

      MsgBox("No ports connected.")

   End Try

End Sub
Connecting
Double click on the Connect button to bring up the headers for its click event. The following code is used to make the connection to the port,
Private Sub btnConnect_Click(sender As System.Object, e As System.EventArgs) Handles btnConnect.Click

   Try

      sp.BaudRate = cmbBaud.SelectedItem.ToString

      sp.PortName = cmbPort.SelectedItem.ToString

      sp.Open()

   If sp.IsOpen Then

      btnConnect.Visible = False

      cmbPort.Enabled = False

      cmbBaud.Enabled = False

      btnDisconnect.Visible = True

      End If

   Catch

      sp.Close()

   End Try

End Sub
Disconnecting
Double click on the Disconnect button to bring up the headers for its click event. The following code closes the connect to the port,
Private Sub btnDisconnect_Click(sender As System.Object, e As System.EventArgs) Handles btnDisconnect.Click

   Try

      sp.Close()

      btnConnect.Visible = True

      btnDisconnect.Visible = False

      cmbPort.Enabled = True

      cmbBaud.Enabled = True

      Exit Sub

   Catch

      MessageBox.Show("Some kind of problem.")

   End Try

End Sub
We also need to make sure that a disconnection is made before the program is closed. Go to the properties window for the form. Click on the lightning symbol to find the list of events. Double click in the box next to Form_Closing and add the following code,
Private Sub Form1_FormClosing(sender As System.Object, e As System.Windows.Forms.FormClosingEventArgs) Handles MyBase.FormClosing

   If sp.IsOpen() Then

      MessageBox.Show("Disconnect before closing")

      e.Cancel = True

   End If

End Sub
This last block of code prevents the user from closing the form without first disconnecting.
Receiving Data
Our last main job is to create an event handler to process information arriving at the serial port.
Private Sub SerialPort_DataReceived(ByVal sender As Object, ByVal e As System.IO.Ports.SerialDataReceivedEventArgs) Handles sp.DataReceived

   Dim str As String = sp.ReadExisting()

   Invoke(myDelegate, str)

End Sub
Sending Data To The Arduino
We need to amend our Arduino sketch a little so that it can receive data from our program.
void setup()

{

 Serial.begin(9600);

}

void loop()

{


  if (Serial.available())

  {

  char thischar = Serial.read();

  Serial.println(thischar);

  }

  delay(1000);

}
Add Controls To The Form
Back in Visual Basic, we need some controls to be able to send data to the Arduino.
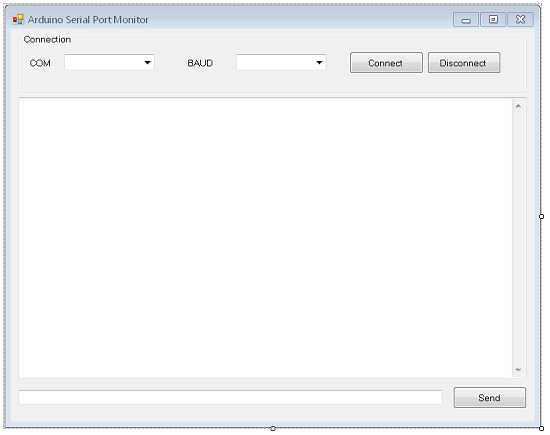
Here you can see a Textbox which I have called txtMessage and a button called btnSend.
Double click on the button to bring up the code for its event handler.
Private Sub btnSend_Click(sender As System.Object, e As System.EventArgs) Handles btnSend.Click

   If sp.IsOpen() Then

      sp.WriteLine(txtMessage.Text)

      txtMessage.Text = ""

   End If

End Sub
If the port is open, then the contents of the TextBox are written to it.
You can test the program at this stage. Whatever you type in and send will be printed back to the serial port, one character at a time (with a delay of one second between each character).
Challenges
This page demonstrates a principle. So far it does not make anything that you haven't already got within the Arduino IDE, but it does show that you can send and receive data to and from the Arduino using Visual Basic.
One simple extension to this program would be some additional functionality. For example, you could make it possible to clear the TextBox of incoming messages. This is useful if you have a lot of data streaming from the Arduino and all you want to do is see what is happening at any point in time.
You could add a time index next to each line that you receive from the Arduino. That would be useful for measuring the delays that this chain of communication can create. You will notice that the odd millisecond is lost here or there. It would also be useful if you were to use the Arduino for data logging over time.
One really useful bit of functionality would be the ability to save the data in the TextBox to a file. A flexible approach to this would be most useful for the user. For example, imagine that when they choose to save the contents of the TextBox, another window popped up showing those contents, allowing them to make small edits to remove any unwanted items (you often get strange or partial readings at the points where you connect or disconnect) before saving the file with the extension of their choice.