Other
Arduino - LED Projects
Arduino - Buzzer Projects
Arduino - Midi Projects
Arduino - Microview
Arduino - Other Projects
Arduino - Visual Basic.NET
Arduino - Tim's Projects
Arduino - Links
![]()


Microview Bitmaps
Introduction
The Microview library does not have a method for loading a 64x48 bitmap to the screen. This page is about working out simple ways to store the data for an image and put it on the screen. The code is relatively simple. The focus for this page is on how the bitmap data are represented.
We will be writing directly to the screen buffer of the Microview. It is an array of 384 bytes, with the 'ON' bits representing pixels that are on. The first 64 bytes (0 - 63) represent the top part of the display.
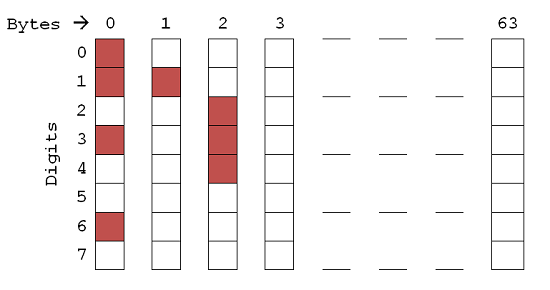
The first 64 bytes represent the pixel data for the first 8 rows of the display. The next 64 bytes represent the data for the next 8 rows of the display, starting from the left edge again, with the place values in the same order as in the diagram.
Clearly, working out all the byte values is a laborious task. In order to get the code going, we'll use a pattern that is easy to work out by hand.
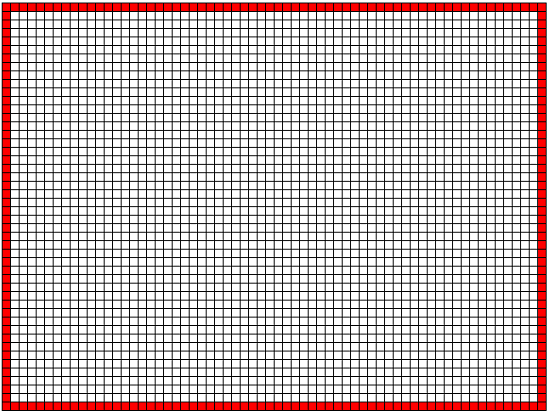
- Byte 0 - All the bits are on for the first byte, so it is 255
- Bytes 1 - 62 - The first bit is on for these, so they are all 1
- Bytes 63 & 64 - All bits on, 255
- Bytes 65 - 126 - All bits off, 0
- And so on...
When it's all worked out, we can write some Arduino code to store our image,
byte bmp[] = {255, 1, 1, 1, 1, 1, 1, 1, 1, 1, 1, 1, 1, 1, 1, 1, 1, 1, 1, 1, 1, 1, 1, 1, 1, 1, 1, 1, 1, 1, 1, 1, 1, 1, 1, 1, 1, 1, 1, 1, 1, 1, 1, 1, 1, 1, 1, 1, 1, 1, 1, 1, 1, 1, 1, 1, 1, 1, 1, 1, 1, 1, 1, 255, 255, 0, 0, 0, 0, 0, 0, 0, 0, 0, 0, 0, 0, 0, 0, 0, 0, 0, 0, 0, 0, 0, 0, 0, 0, 0, 0, 0, 0, 0, 0, 0, 0, 0, 0, 0, 0, 0, 0, 0, 0, 0, 0, 0, 0, 0, 0, 0, 0, 0, 0, 0, 0, 0, 0, 0, 0, 0, 0, 0, 0, 0, 0, 255, 255, 0, 0, 0, 0, 0, 0, 0, 0, 0, 0, 0, 0, 0, 0, 0, 0, 0, 0, 0, 0, 0, 0, 0, 0, 0, 0, 0, 0, 0, 0, 0, 0, 0, 0, 0, 0, 0, 0, 0, 0, 0, 0, 0, 0, 0, 0, 0, 0, 0, 0, 0, 0, 0, 0, 0, 0, 0, 0, 0, 0, 0, 0, 255, 255, 0, 0, 0, 0, 0, 0, 0, 0, 0, 0, 0, 0, 0, 0, 0, 0, 0, 0, 0, 0, 0, 0, 0, 0, 0, 0, 0, 0, 0, 0, 0, 0, 0, 0, 0, 0, 0, 0, 0, 0, 0, 0, 0, 0, 0, 0, 0, 0, 0, 0, 0, 0, 0, 0, 0, 0, 0, 0, 0, 0, 0, 0, 255, 255, 0, 0, 0, 0, 0, 0, 0, 0, 0, 0, 0, 0, 0, 0, 0, 0, 0, 0, 0, 0, 0, 0, 0, 0, 0, 0, 0, 0, 0, 0, 0, 0, 0, 0, 0, 0, 0, 0, 0, 0, 0, 0, 0, 0, 0, 0, 0, 0, 0, 0, 0, 0, 0, 0, 0, 0, 0, 0, 0, 0, 0, 0, 255, 255, 128, 128, 128, 128, 128, 128, 128, 128, 128, 128, 128, 128, 128, 128, 128, 128, 128, 128, 128, 128, 128, 128, 128, 128, 128, 128, 128, 128, 128, 128, 128, 128, 128, 128, 128, 128, 128, 128, 128, 128, 128, 128, 128, 128, 128, 128, 128, 128, 128, 128, 128, 128, 128, 128, 128, 128, 128, 128, 128, 128, 128, 128, 255};
You Will Need
- Microview
Making The Circuit
Just connect the Microview to the PC via USB either using the programming board or a 5V FTDI cable/breakout board.
Programming The Arduino
This example draws our bitmap to the screen once, during setup.
#include <MicroView.h>


byte bmp[] = {255, 1, 1, 1, 1, 1, 1, 1, 1, 1, 1, 1, 1, 1, 1, 1, 1, 1, 1, 1, 1, 1, 1, 1, 1, 1, 1, 1, 1, 1, 1, 1, 1, 1, 1, 1, 1, 1, 1, 1, 1, 1, 1, 1, 1, 1, 1, 1, 1, 1, 1, 1, 1, 1, 1, 1, 1, 1, 1, 1, 1, 1, 1, 255, 255, 0, 0, 0, 0, 0, 0, 0, 0, 0, 0, 0, 0, 0, 0, 0, 0, 0, 0, 0, 0, 0, 0, 0, 0, 0, 0, 0, 0, 0, 0, 0, 0, 0, 0, 0, 0, 0, 0, 0, 0, 0, 0, 0, 0, 0, 0, 0, 0, 0, 0, 0, 0, 0, 0, 0, 0, 0, 0, 0, 0, 0, 0, 255, 255, 0, 0, 0, 0, 0, 0, 0, 0, 0, 0, 0, 0, 0, 0, 0, 0, 0, 0, 0, 0, 0, 0, 0, 0, 0, 0, 0, 0, 0, 0, 0, 0, 0, 0, 0, 0, 0, 0, 0, 0, 0, 0, 0, 0, 0, 0, 0, 0, 0, 0, 0, 0, 0, 0, 0, 0, 0, 0, 0, 0, 0, 0, 255, 255, 0, 0, 0, 0, 0, 0, 0, 0, 0, 0, 0, 0, 0, 0, 0, 0, 0, 0, 0, 0, 0, 0, 0, 0, 0, 0, 0, 0, 0, 0, 0, 0, 0, 0, 0, 0, 0, 0, 0, 0, 0, 0, 0, 0, 0, 0, 0, 0, 0, 0, 0, 0, 0, 0, 0, 0, 0, 0, 0, 0, 0, 0, 255, 255, 0, 0, 0, 0, 0, 0, 0, 0, 0, 0, 0, 0, 0, 0, 0, 0, 0, 0, 0, 0, 0, 0, 0, 0, 0, 0, 0, 0, 0, 0, 0, 0, 0, 0, 0, 0, 0, 0, 0, 0, 0, 0, 0, 0, 0, 0, 0, 0, 0, 0, 0, 0, 0, 0, 0, 0, 0, 0, 0, 0, 0, 0, 255, 255, 128, 128, 128, 128, 128, 128, 128, 128, 128, 128, 128, 128, 128, 128, 128, 128, 128, 128, 128, 128, 128, 128, 128, 128, 128, 128, 128, 128, 128, 128, 128, 128, 128, 128, 128, 128, 128, 128, 128, 128, 128, 128, 128, 128, 128, 128, 128, 128, 128, 128, 128, 128, 128, 128, 128, 128, 128, 128, 128, 128, 128, 128, 255};


void setup() {

  uView.begin();

  uView.clear(ALL);

  uView.clear(PAGE);

  // write the bitmap's bytes to the screen buffer

  byte *ptr = uView.getScreenBuffer();

  for (int i=0;i<=383;i++)

  {

   ptr[i] = bmp[i];

  }

 // show the image

  uView.display();

}


void loop() {


}
Make Your Own Bitmaps
You could work out your bitmap data by hand. It will take a while though and isn't much fun after the first few goes. Writing a program to help is worth the effort. The following image is a screenshot of a very basic program written to convert the bitmaps I draw into an array of bytes like the one used in the code.
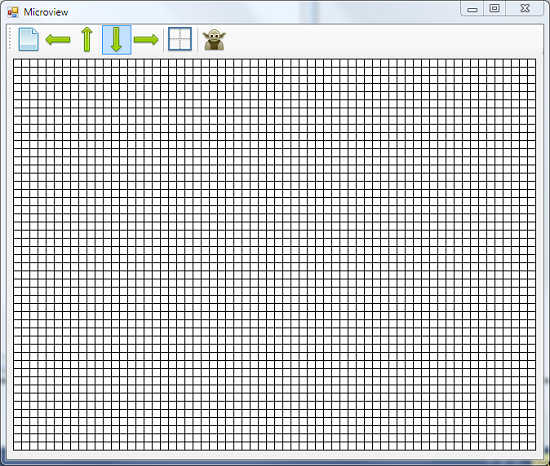
The program stores the pixels in a 2 dimensional array of booleans. The pseudocode for creating the byte array is as follows,
Dim bmp(383) as byte

thisByte ← 0

counter ← 0

For row As Integer ← 0 To 47 Step 8

   For col As Integer ← 0 To 63

      thisByte ← 0

      For i As Integer ← 0 To 7

         If pixel(col, row + i) Then

            thisByte ← thisByte + 2 ^ i

         End If

      Next

   bmp(counter) ← thisByte

   counter ← counter + 1

   Next

Next